Custom-Endpoint Multi-Turn Simulations
Okareo can drive a full conversation against your running service (RAG pipeline, tool-calling agent, or any HTTP API) by mapping requests & JSON responses to a Custom Endpoint Target. This guide shows you, step-by-step, how to run a multi-turn simulation using custom endpoints, in either the Okareo UI or SDK.
You'll follow the same four core steps you saw in the Multi-Turn Overview.
Cookbook examples for this guide are available:
New to simulations? See the Simulation Overview.
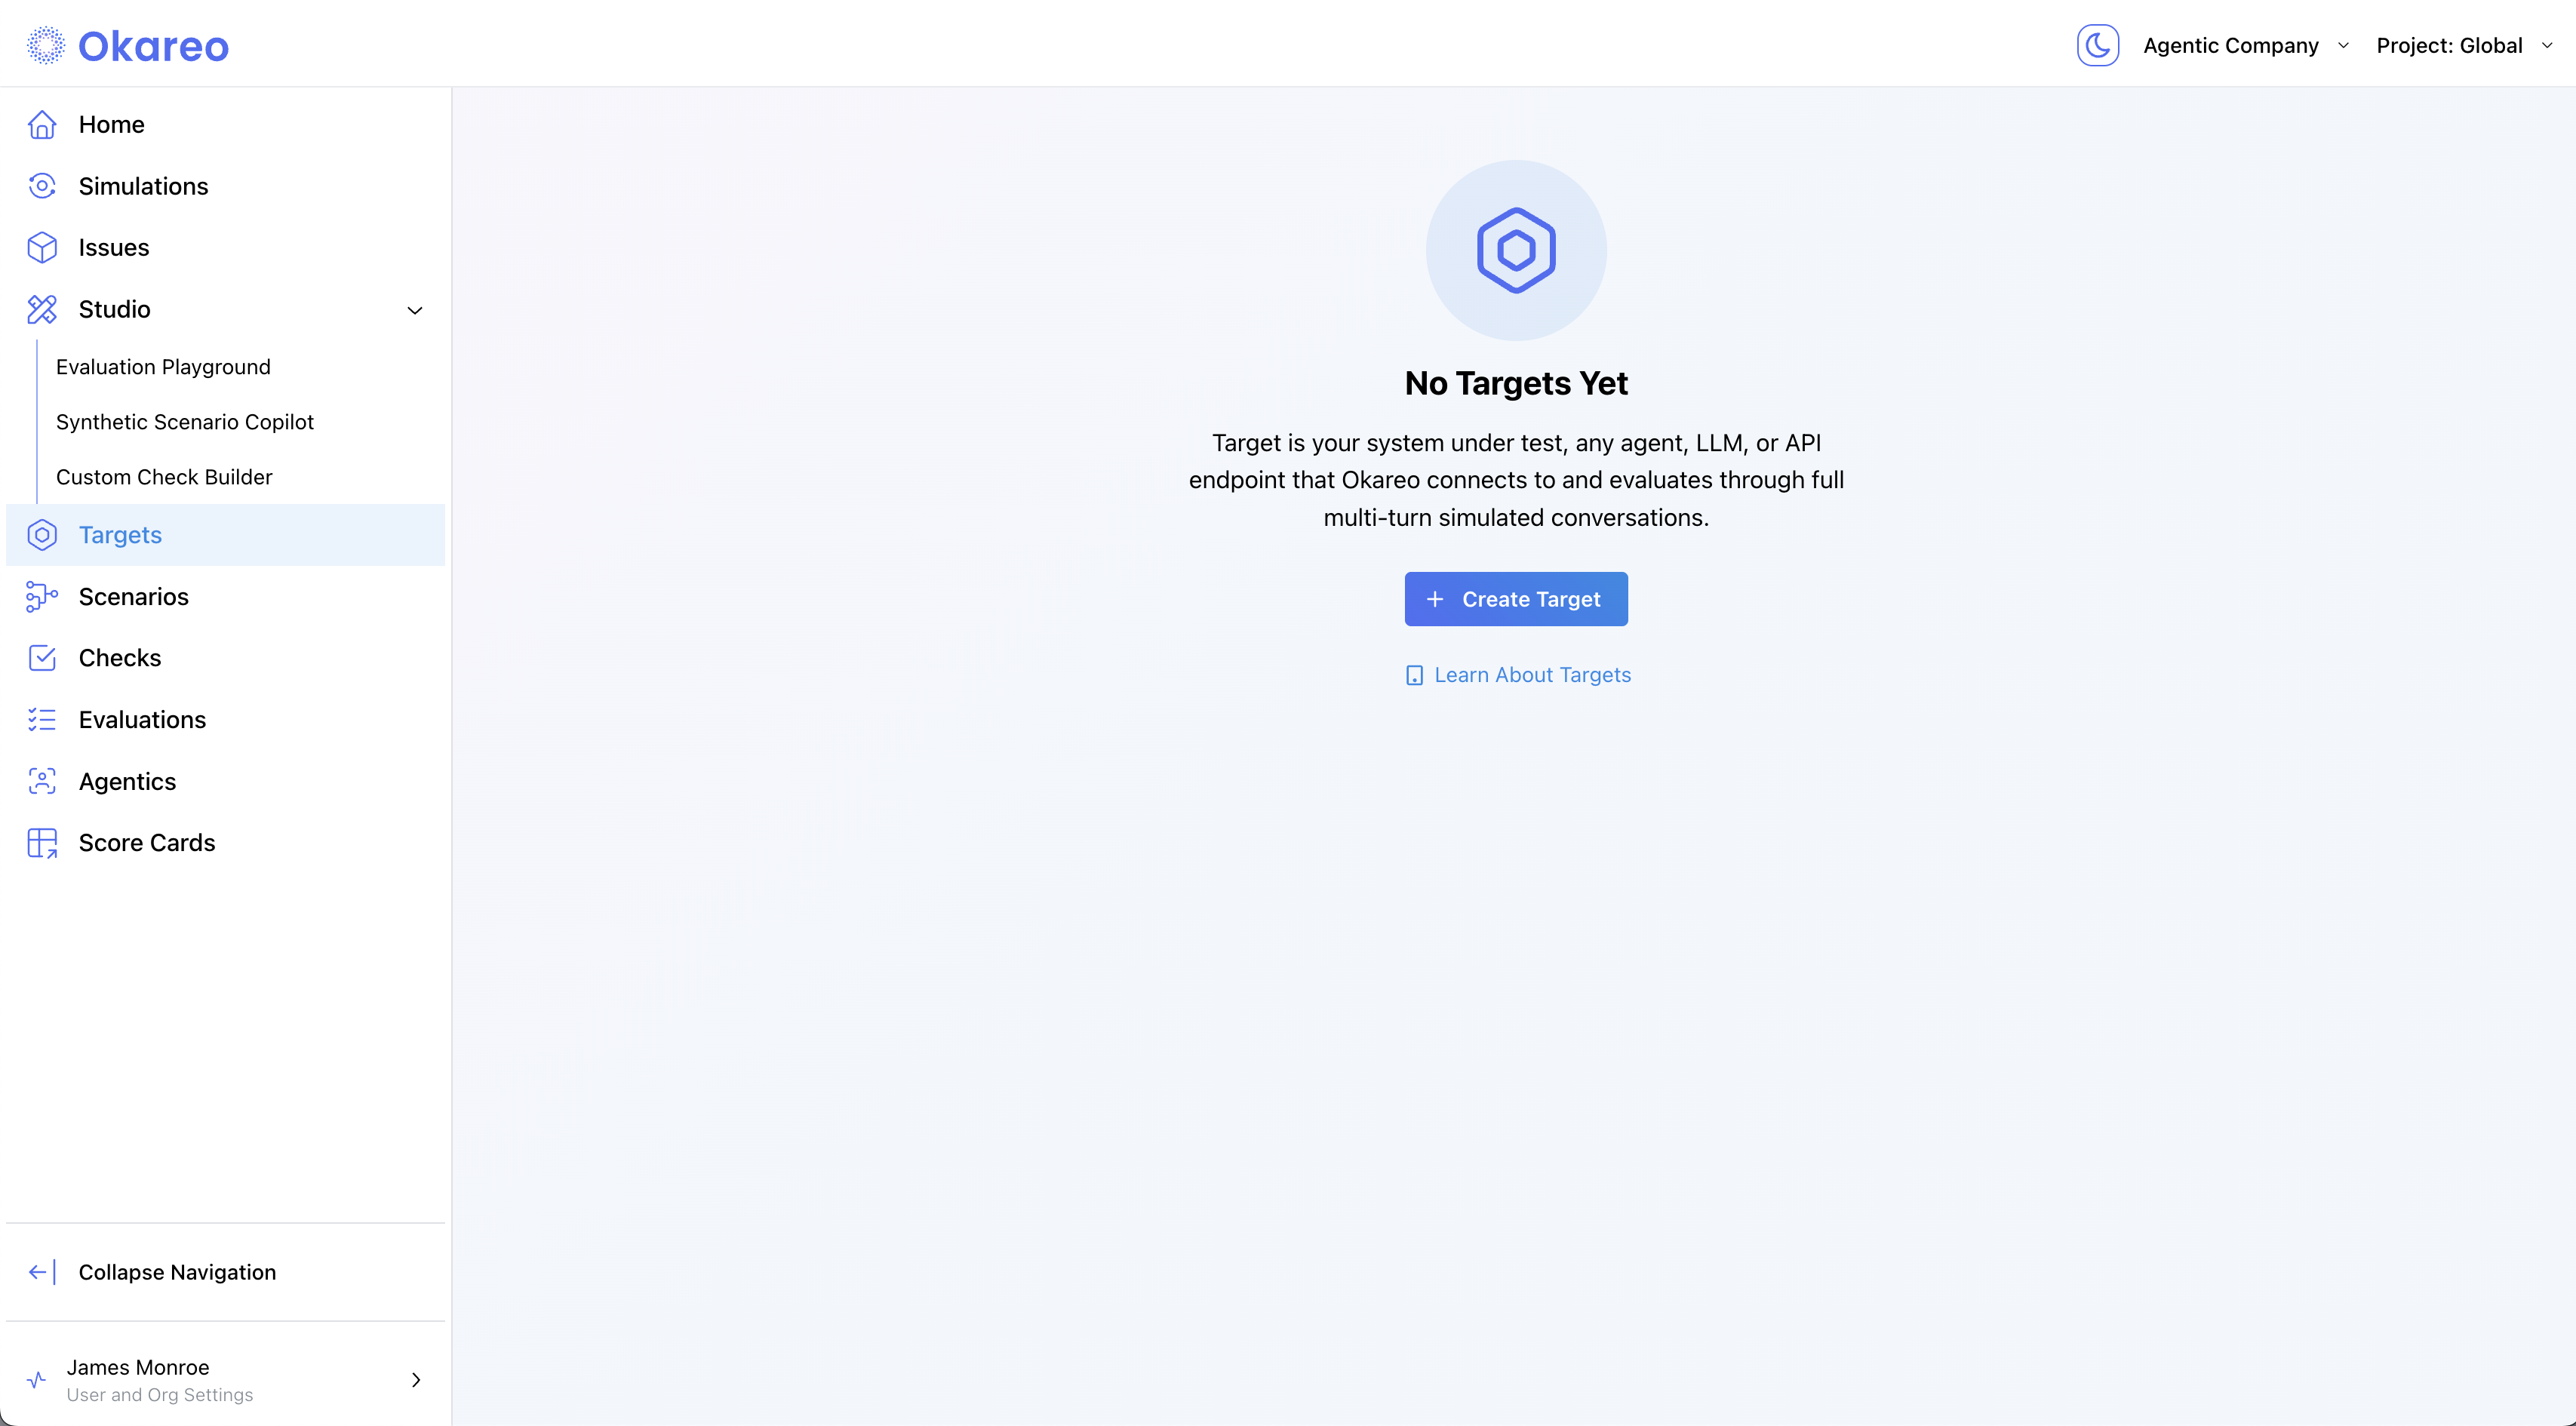
1 · Configure a Target
A Target is the system you’re testing (your RAG service, tool-calling agent, or any HTTP API). You can reuse the same Target across multiple simulations.
You can configure the Target in two ways:
- Custom Endpoint – any HTTP-accessible API you provide (e.g., your RAG pipeline, tool-calling agent, or backend chat service).
- Foundation Model – a pre-integrated model (e.g., GPT-4o mini) selected from Okareo’s catalog.
A Custom Endpoint Target specifies:
- How sessions are started (e.g., to create a conversation thread or context).
- How each turn is sent and how the responses are extracted.
- How sessions are ended or finalized.
- Okareo UI
- Python
- TypeScript
-
Navigate to Targets and click ➕ Create Target.
-
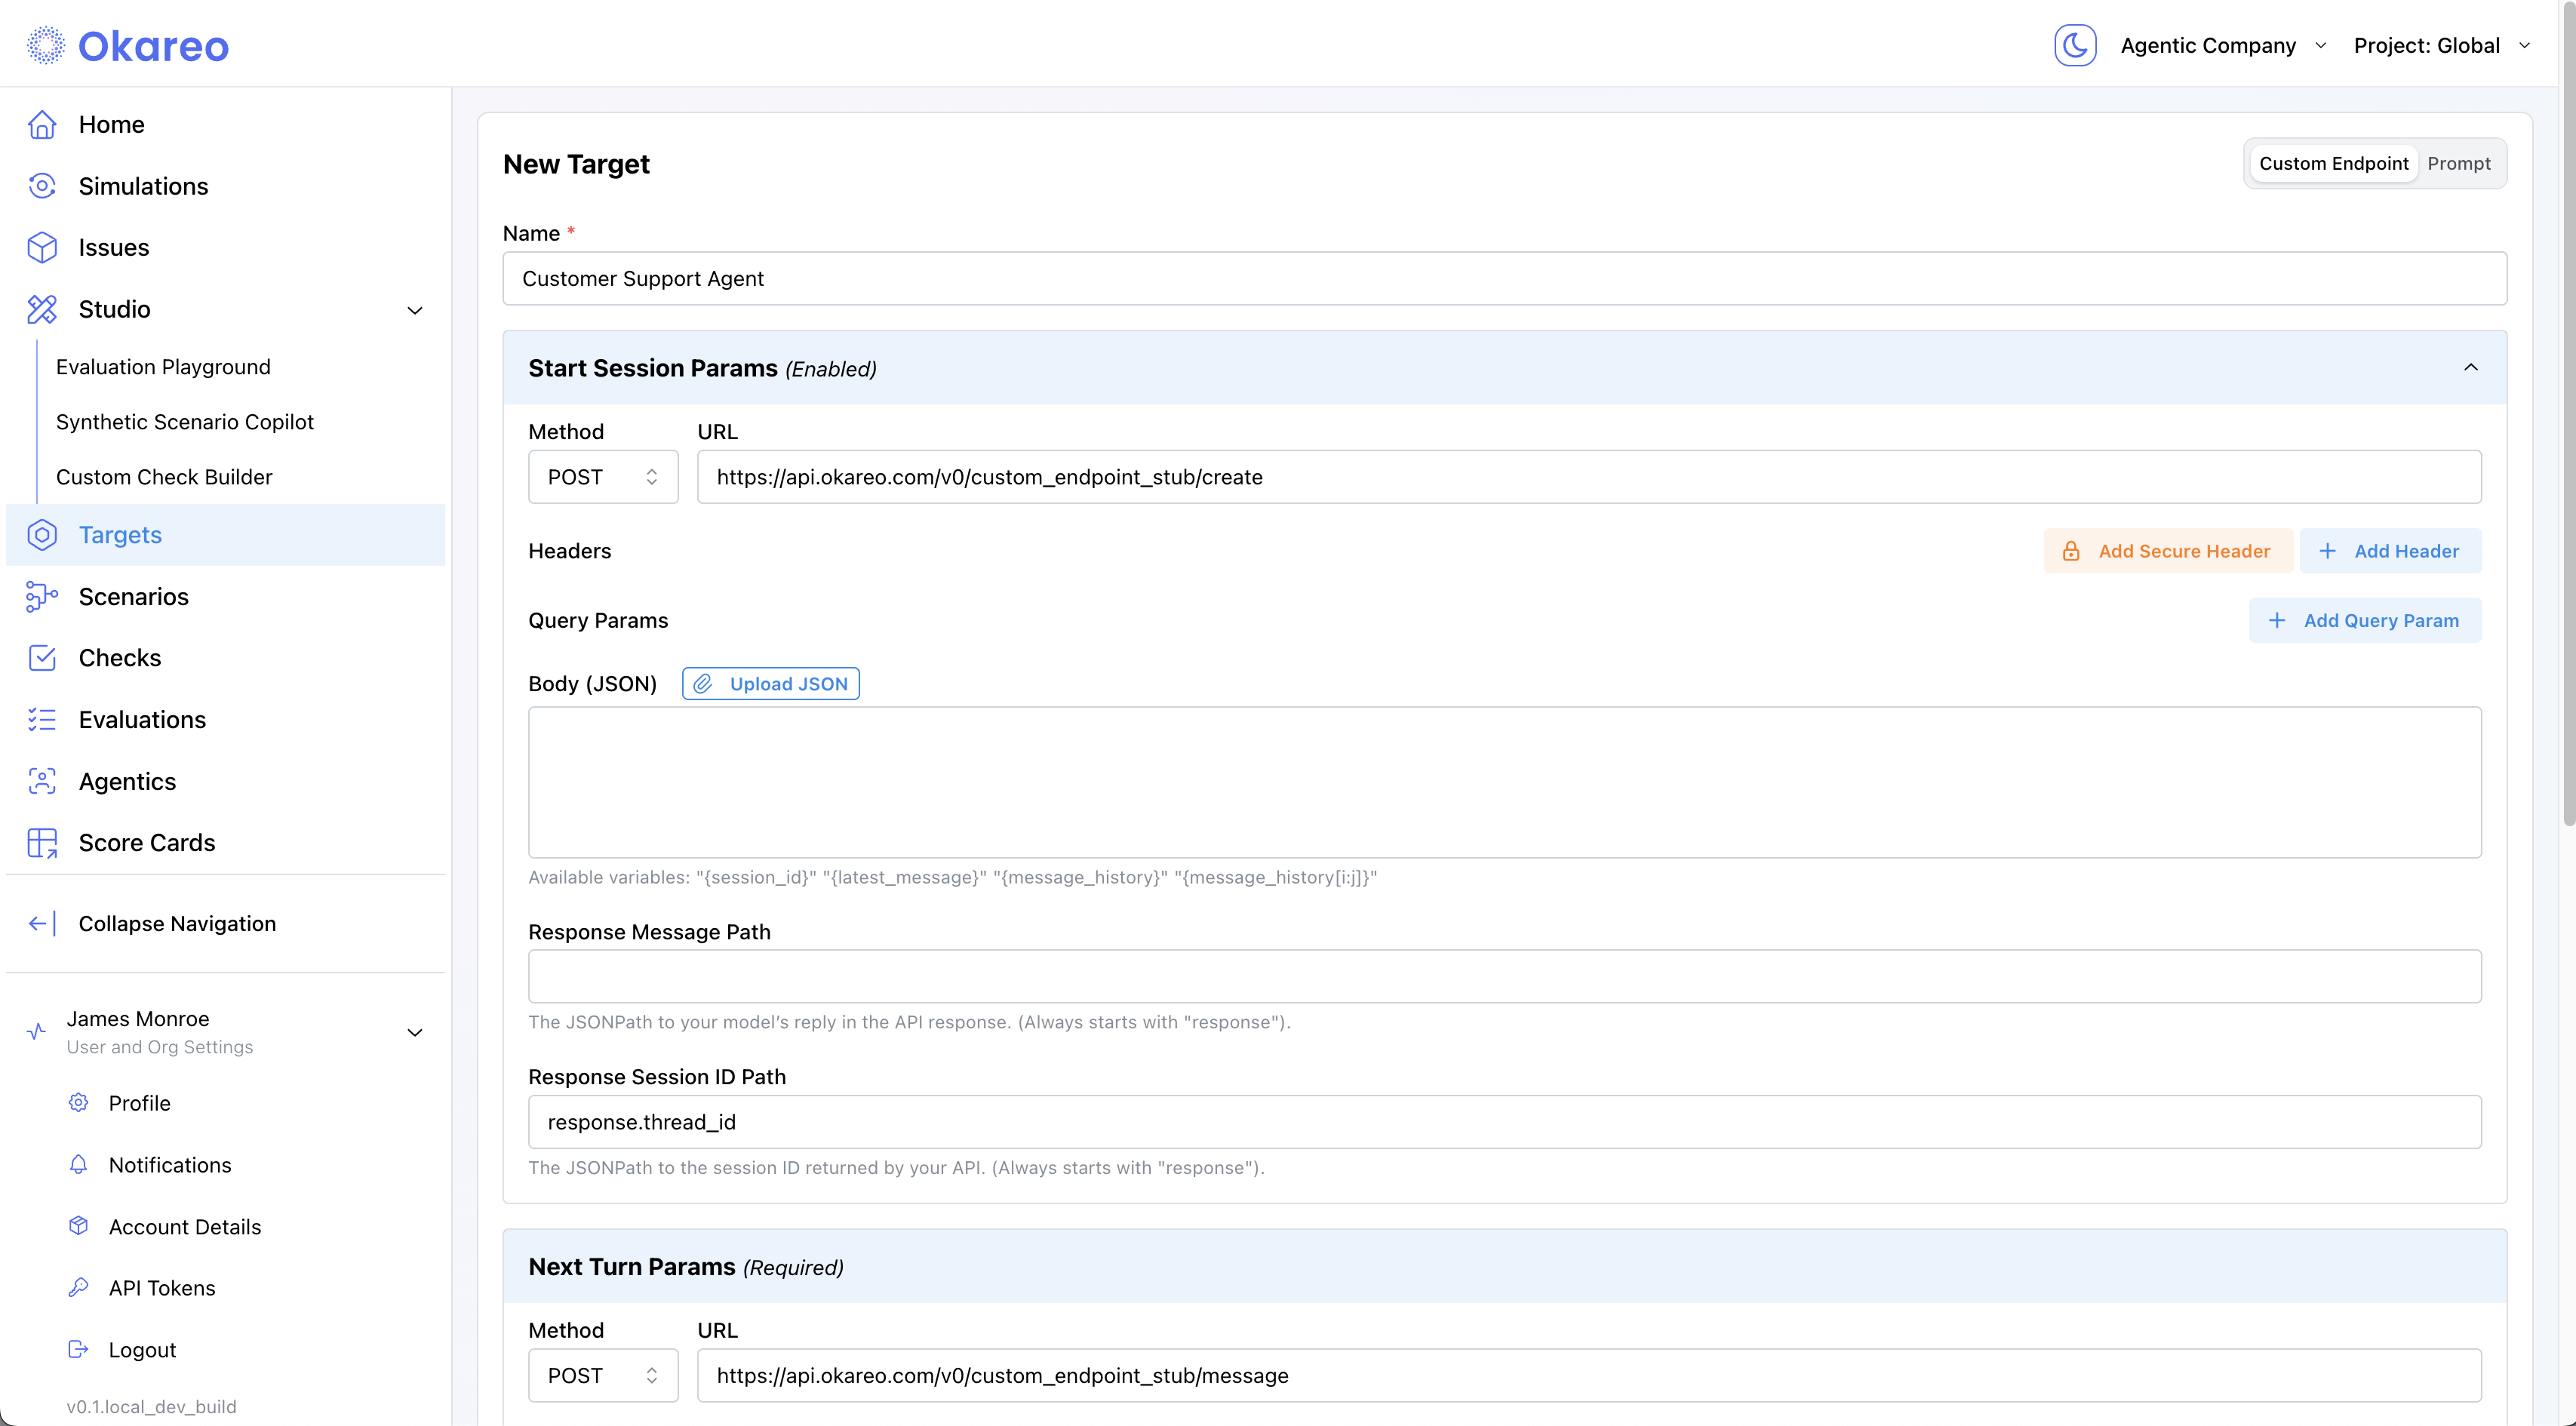
Choose Custom Endpoint and fill in the three API calls that define your conversation:
- Start Session (optional, called once before the first turn)
- Next Turn (required, called every turn)
- End Session (optional, called once after the final turn)
All three calls share the same fields:
- Method – HTTP verb (
POST,GET, …) - URL – endpoint to call
- Headers / Query Params – auth & custom metadata (e.g.,
api-key) - Body Template – JSON with template variables, e.g.
{latest_message},{message_history},{session_id},{scenario_row_run_guid} - Response Message Path – JSONPath to the assistant’s reply
- Response Session ID Path – JSONPath to the session/thread id (for Start Session)
{access_token}variable (when Credential Authentication is enabled; see below) – the acquired token, injected into your downstream calls (Start Session, Next Turn, End Session). Add a headerAuthorization: Bearer {access_token}to pass the token to your API.- Max Parallel Requests (optional) – limits how many concurrent requests Okareo sends to your API during a simulation. Leave empty for default concurrency. Set this when your API has rate limits or can only handle a limited number of simultaneous connections (e.g.,
5).
Credential Authentication
In addition to the per-call settings above, your Target can acquire an OAuth token automatically before each simulation. Use this when your API requires a dynamically acquired OAuth2 token rather than a static API key or bearer token.
Expand the Credential Authentication accordion at the bottom of the target form to configure it. Okareo acquires the token once at the start of each conversation. If a downstream call returns HTTP 401, Okareo re-authenticates once and retries the call.
The most common configuration is an OAuth2
client_credentialsflow. Your setup may differ depending on your provider.- Auth URL – the token endpoint (e.g.,
https://auth.example.com/oauth2/token) - Method – HTTP verb (typically
POST) - Headers – request headers for the auth call (e.g.,
Content-Type: application/x-www-form-urlencoded). Use Add Secure Header for headers containing secrets. - Body Fields – key-value pairs for your auth request (e.g.,
grant_type=client_credentials,client_id=...,client_secret=...). Use Add Secure Body Field for values containing secrets (likeclient_secret). Secure fields are redacted with asterisks (********) in subsequent views, API responses, and logs. You cannot edit a secure field after saving — delete and re-add it instead. - Access Token Path – tells Okareo where to find the token in the auth response (see table below)
Once authentication succeeds, use the
{access_token}template variable in your downstream calls (Start Session, Next Turn, End Session) to pass the token to your API. The most common pattern is adding a headerAuthorization: Bearer {access_token}. See the{access_token}variable in the field list above.Access Token Path
The path tells Okareo where to find the token in the auth response. Paths always start with
response..Auth response shape Access Token Path {"access_token": "..."}response.access_token(default){"data": {"token": "..."}}response.data.token{"result": {"access_token": "..."}}response.result.access_tokenIf left blank, Okareo defaults to
response.access_token, which works for most OAuth2 providers.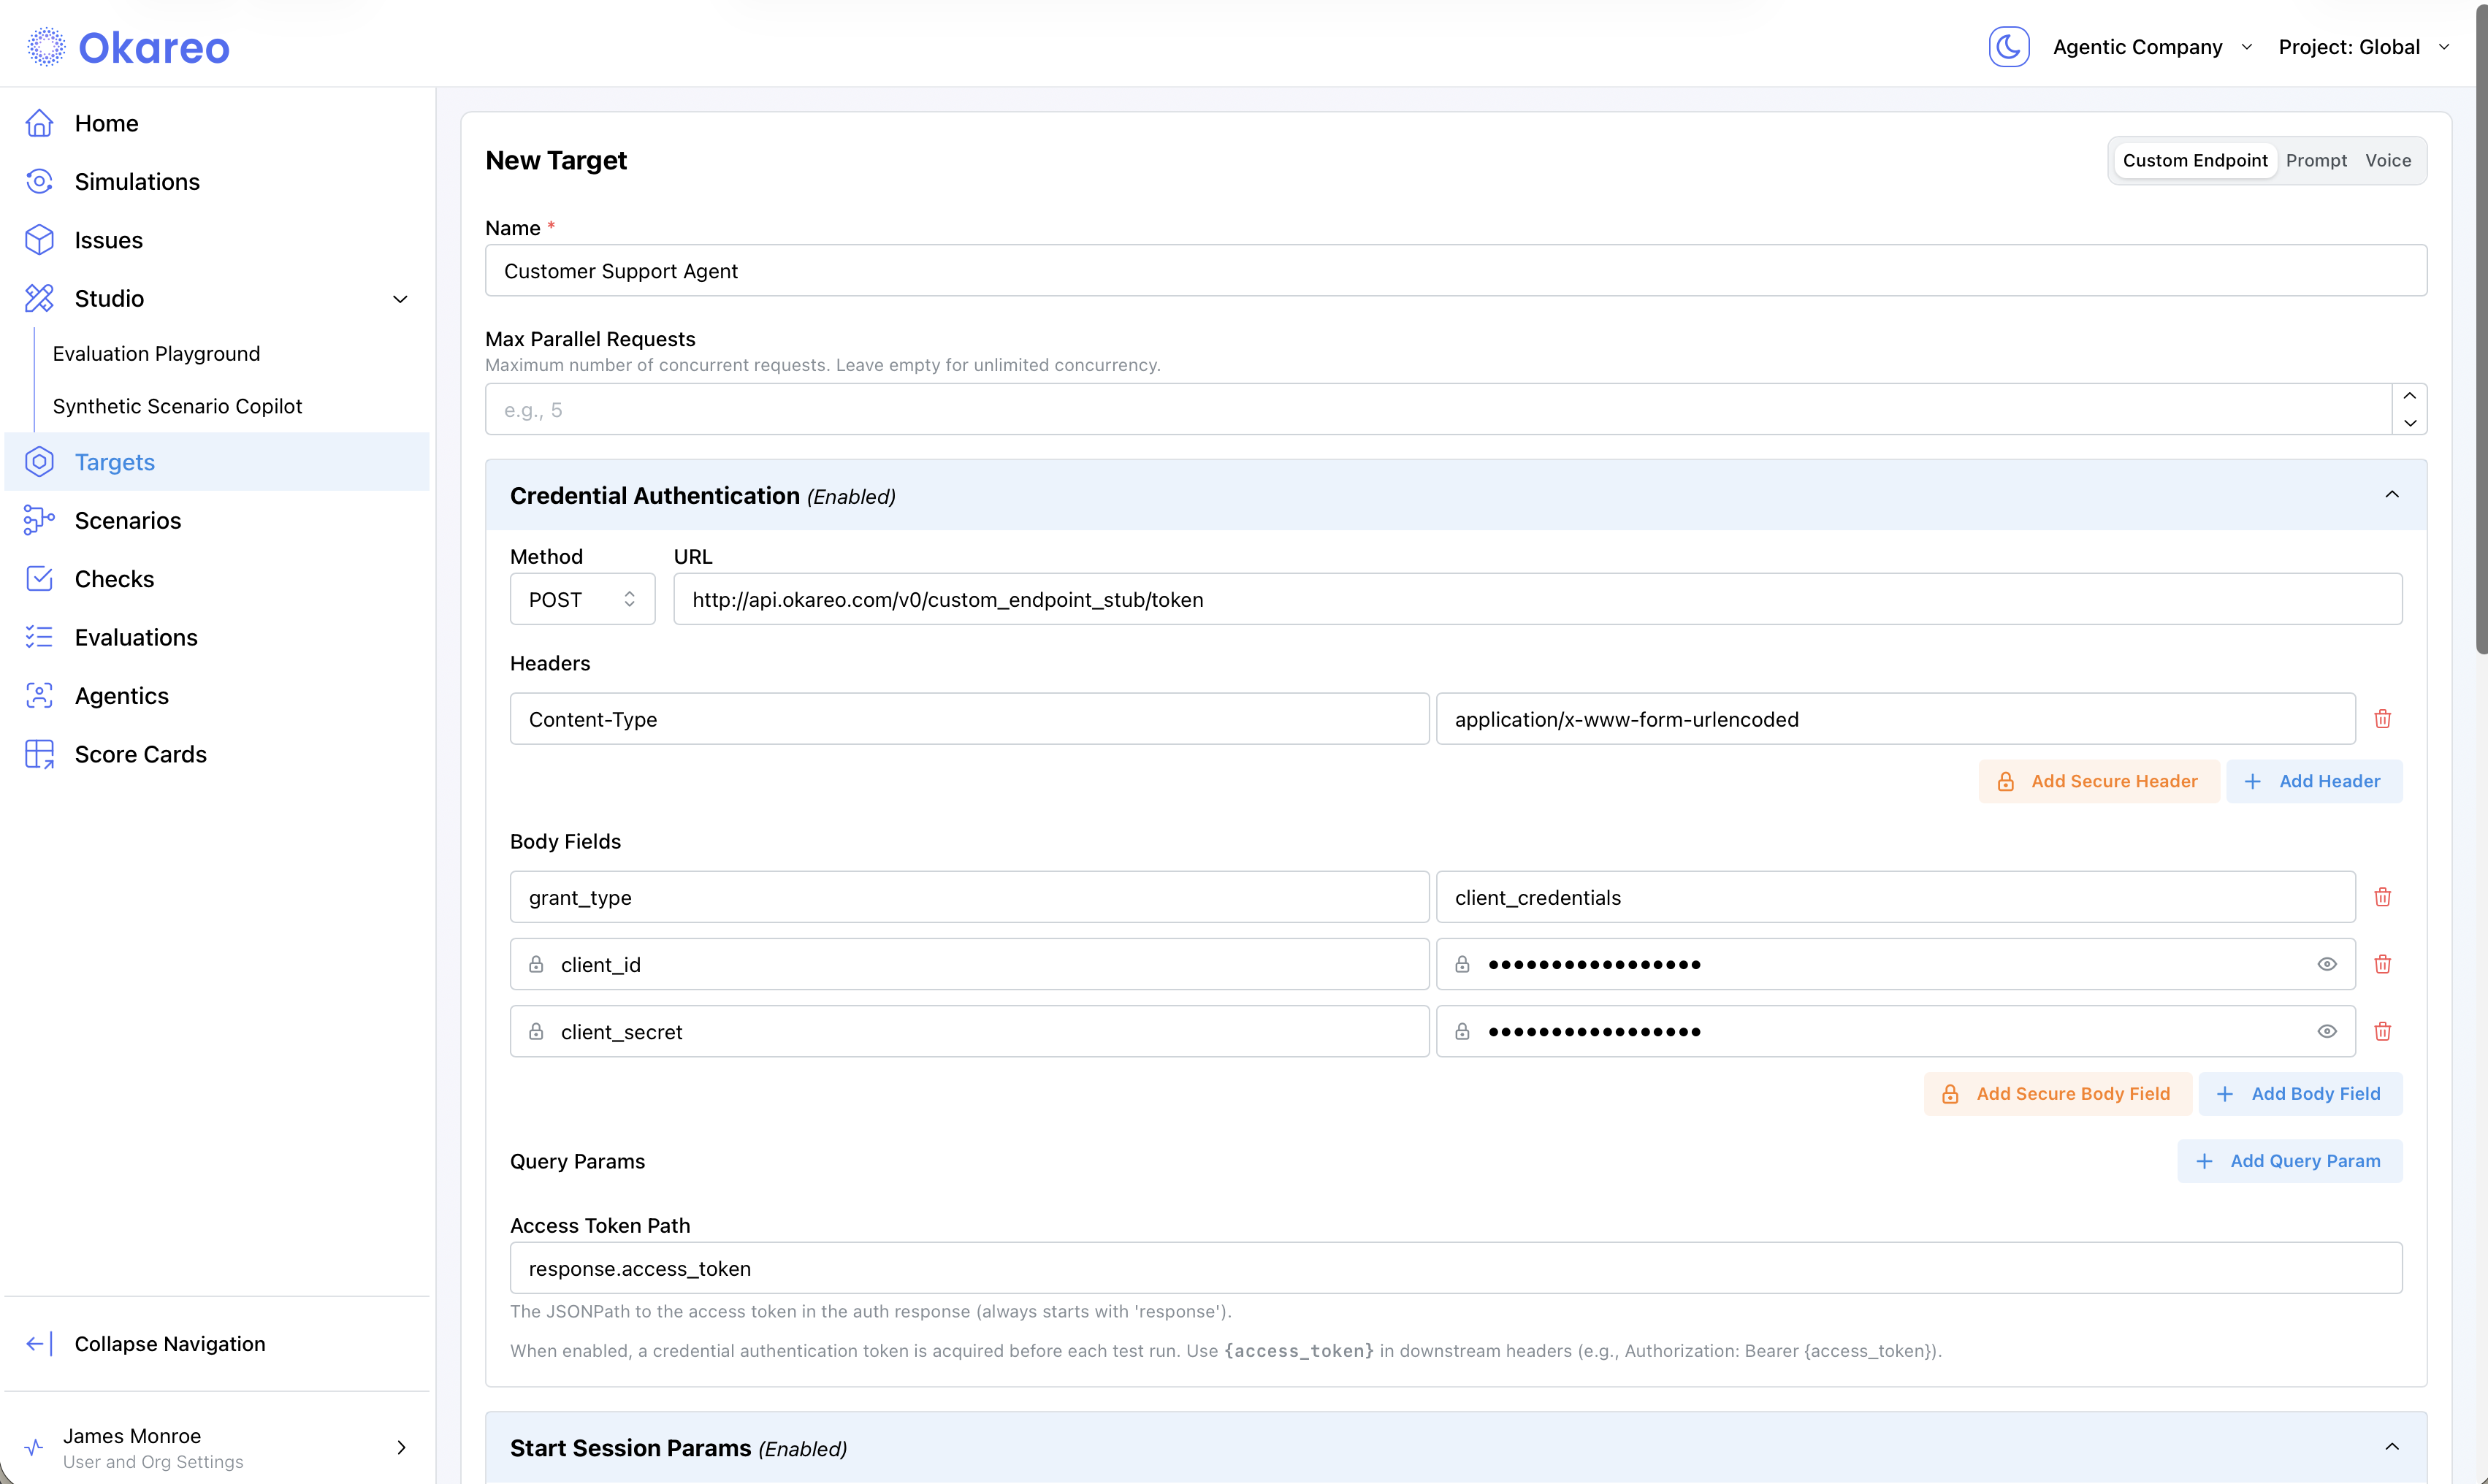
Verifying with Test Calls
When Credential Authentication is enabled, Test Calls shows an Auth section in the response with: the HTTP status code, response headers, the response body (with sensitive fields redacted), and
parsed_valuesshowing the extracted token (truncated for security). Use this to verify your auth configuration before running a simulation.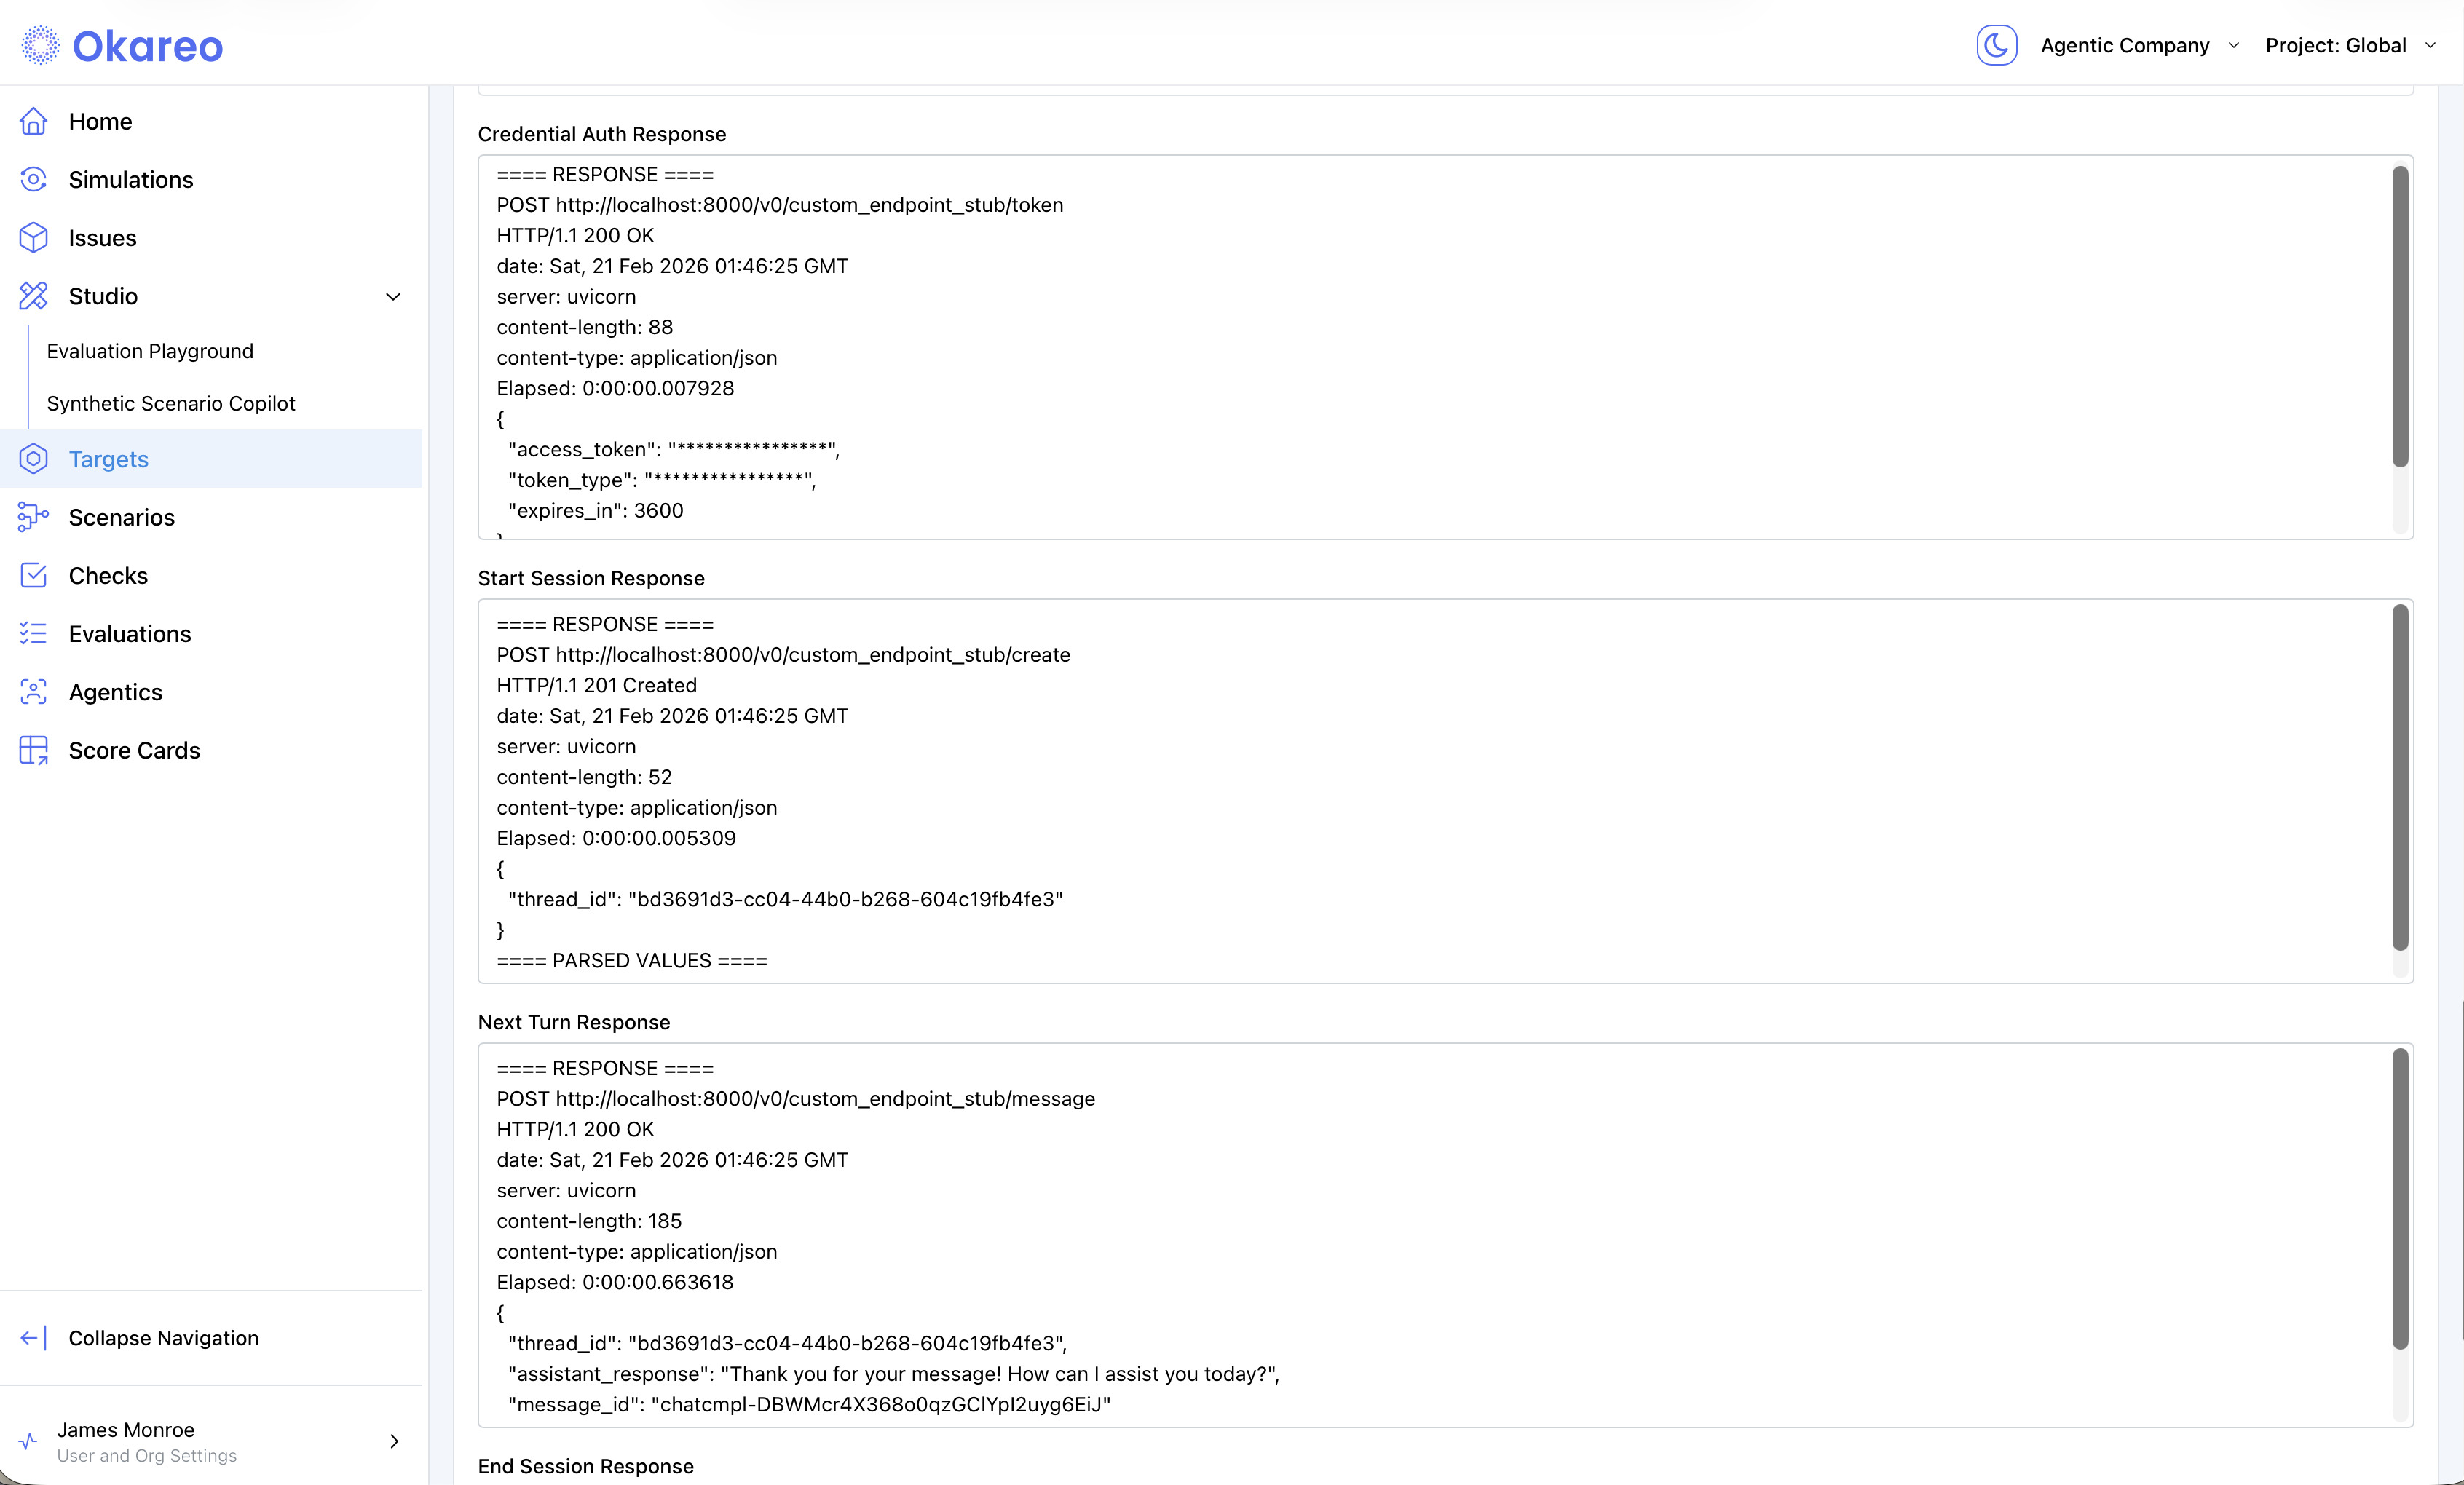
Common Issues
- Auth endpoint returns 401/403 – double-check your
client_id,client_secret, and auth URL. Make sure the token endpoint accepts the grant type and credentials you're providing. - "Could not extract token" error – the Access Token Path doesn't match your auth response structure. Use Test Calls to see the raw auth response body and verify the JSON key path.
- Token acquired but downstream calls fail with 401 – make sure your downstream headers reference
{access_token}. For example:Authorization: Bearer {access_token}. Without this template variable, the token is acquired but never sent to your API. - Auth URL unreachable – verify the URL is accessible from Okareo's servers, not just your local machine.
- Token expires mid-simulation – Okareo acquires the token once at the start of each conversation. If a downstream call returns HTTP 401, Okareo automatically re-authenticates once and retries the call. For very short-lived tokens, ensure your token endpoint is stable and responsive.
Test before savingUse Test Calls to verify your mappings (paths & payloads) return the expected fields.
-
Click Create. Your Target is now available to reuse in any simulation.
Credential Authentication (OAuth token acquisition) is currently available only in the Okareo UI. SDK support for auth_params is coming in a future release.
CREATE_SESSION_URL = "https://api.okareo.com/v0/custom_endpoint_stub/create"
MESSAGES_URL       = "https://api.okareo.com/v0/custom_endpoint_stub/message"
END_SESSION_URL    = "https://api.okareo.com/v0/custom_endpoint_stub/end"

# Common headers (string or dict are supported)
api_headers = json.dumps({
    "Accept": "application/json",
    "Content-Type": "application/json",
    "api-key": OKAREO_API_KEY,
})

# 1) Start Session (optional)
start_config = SessionConfig(
    url=CREATE_SESSION_URL,
    method="POST",
    headers=api_headers,
    # Path to the session/thread id in your API response
    response_session_id_path="response.thread_id",
)

# 2) Next Turn (required)
next_config = TurnConfig(
    url=MESSAGES_URL,
    method="POST",
    headers=api_headers,
    # Body can reference runtime variables:
    #   {latest_message}, {message_history}, {session_id}, {scenario_row_run_guid}
    body={"message": "{latest_message}", "thread_id": "{session_id}"},
    # Path to the assistant/target reply in your API response
    response_message_path="response.assistant_response",
)

# 3) End Session (optional)
end_config = EndSessionConfig(
    url=END_SESSION_URL,
    method="POST",
    headers=api_headers,
    body={"thread_id": "{session_id}"},
)

# Assemble the Custom Endpoint target
custom_endpoint = CustomEndpointTarget(
    start_session=start_config,
    next_turn=next_config,
    end_session=end_config,
)

# Name and reuse this Target across simulations
target = Target(name="Customer API (Custom Endpoint)", target=custom_endpoint)
Credential Authentication (OAuth token acquisition) is currently available only in the Okareo UI. SDK support for auth_params is coming in a future release.
const startConfig: SessionConfig = {
    url: "https://api.example.com/v1/session",
    method: "POST",
    headers: {
        Authorization: "Bearer <TOKEN>",
        "Content-Type": "application/json",
    },
    body: { userId: "<AGENT_ID>" },
    response_session_id_path: "response.id",
};

const nextConfig: TurnConfig = {
    url: "https://api.example.com/v1/session/messages",
    method: "POST",
    headers: {
        Authorization: "Bearer <TOKEN>",
        "Content-Type": "application/json",
    },
    body: { sessionId: "{session_id}", messages: "{message_history}" },
    response_message_path: "response.messages.-1.content",
};

const target: CustomEndpointTarget = {
    start_config: startConfig,
    next_config: nextConfig,
};

const driverModel = new MultiTurnDriver({
    target,
    driver_temperature: 0.7,
    max_turns: 6,
    stop_check: { check_name: "behavior_adherence" },
});

const model = await okareo.register_model({
    name: "Custom Endpoint Demo Model",
    model: driverModel,
    update: true,
});
Driver Parameters
| Parameter | Description |
|---|---|
driver_temperature | Controls randomness of user/agent simulation |
max_turns | Max back-and-forth messages |
repeats | Repeats each test row to capture variance |
first_turn | "driver" or "target" starts conversation |
stop_check | Defines stopping condition (via check) |
2 · Register a Driver
A Driver is the simulated user persona that talks to your Target.
Configuring LLMs to role-play as a user can be challenging. See our guide on Creating Drivers
- Okareo UI
- Python
- TypeScript
-
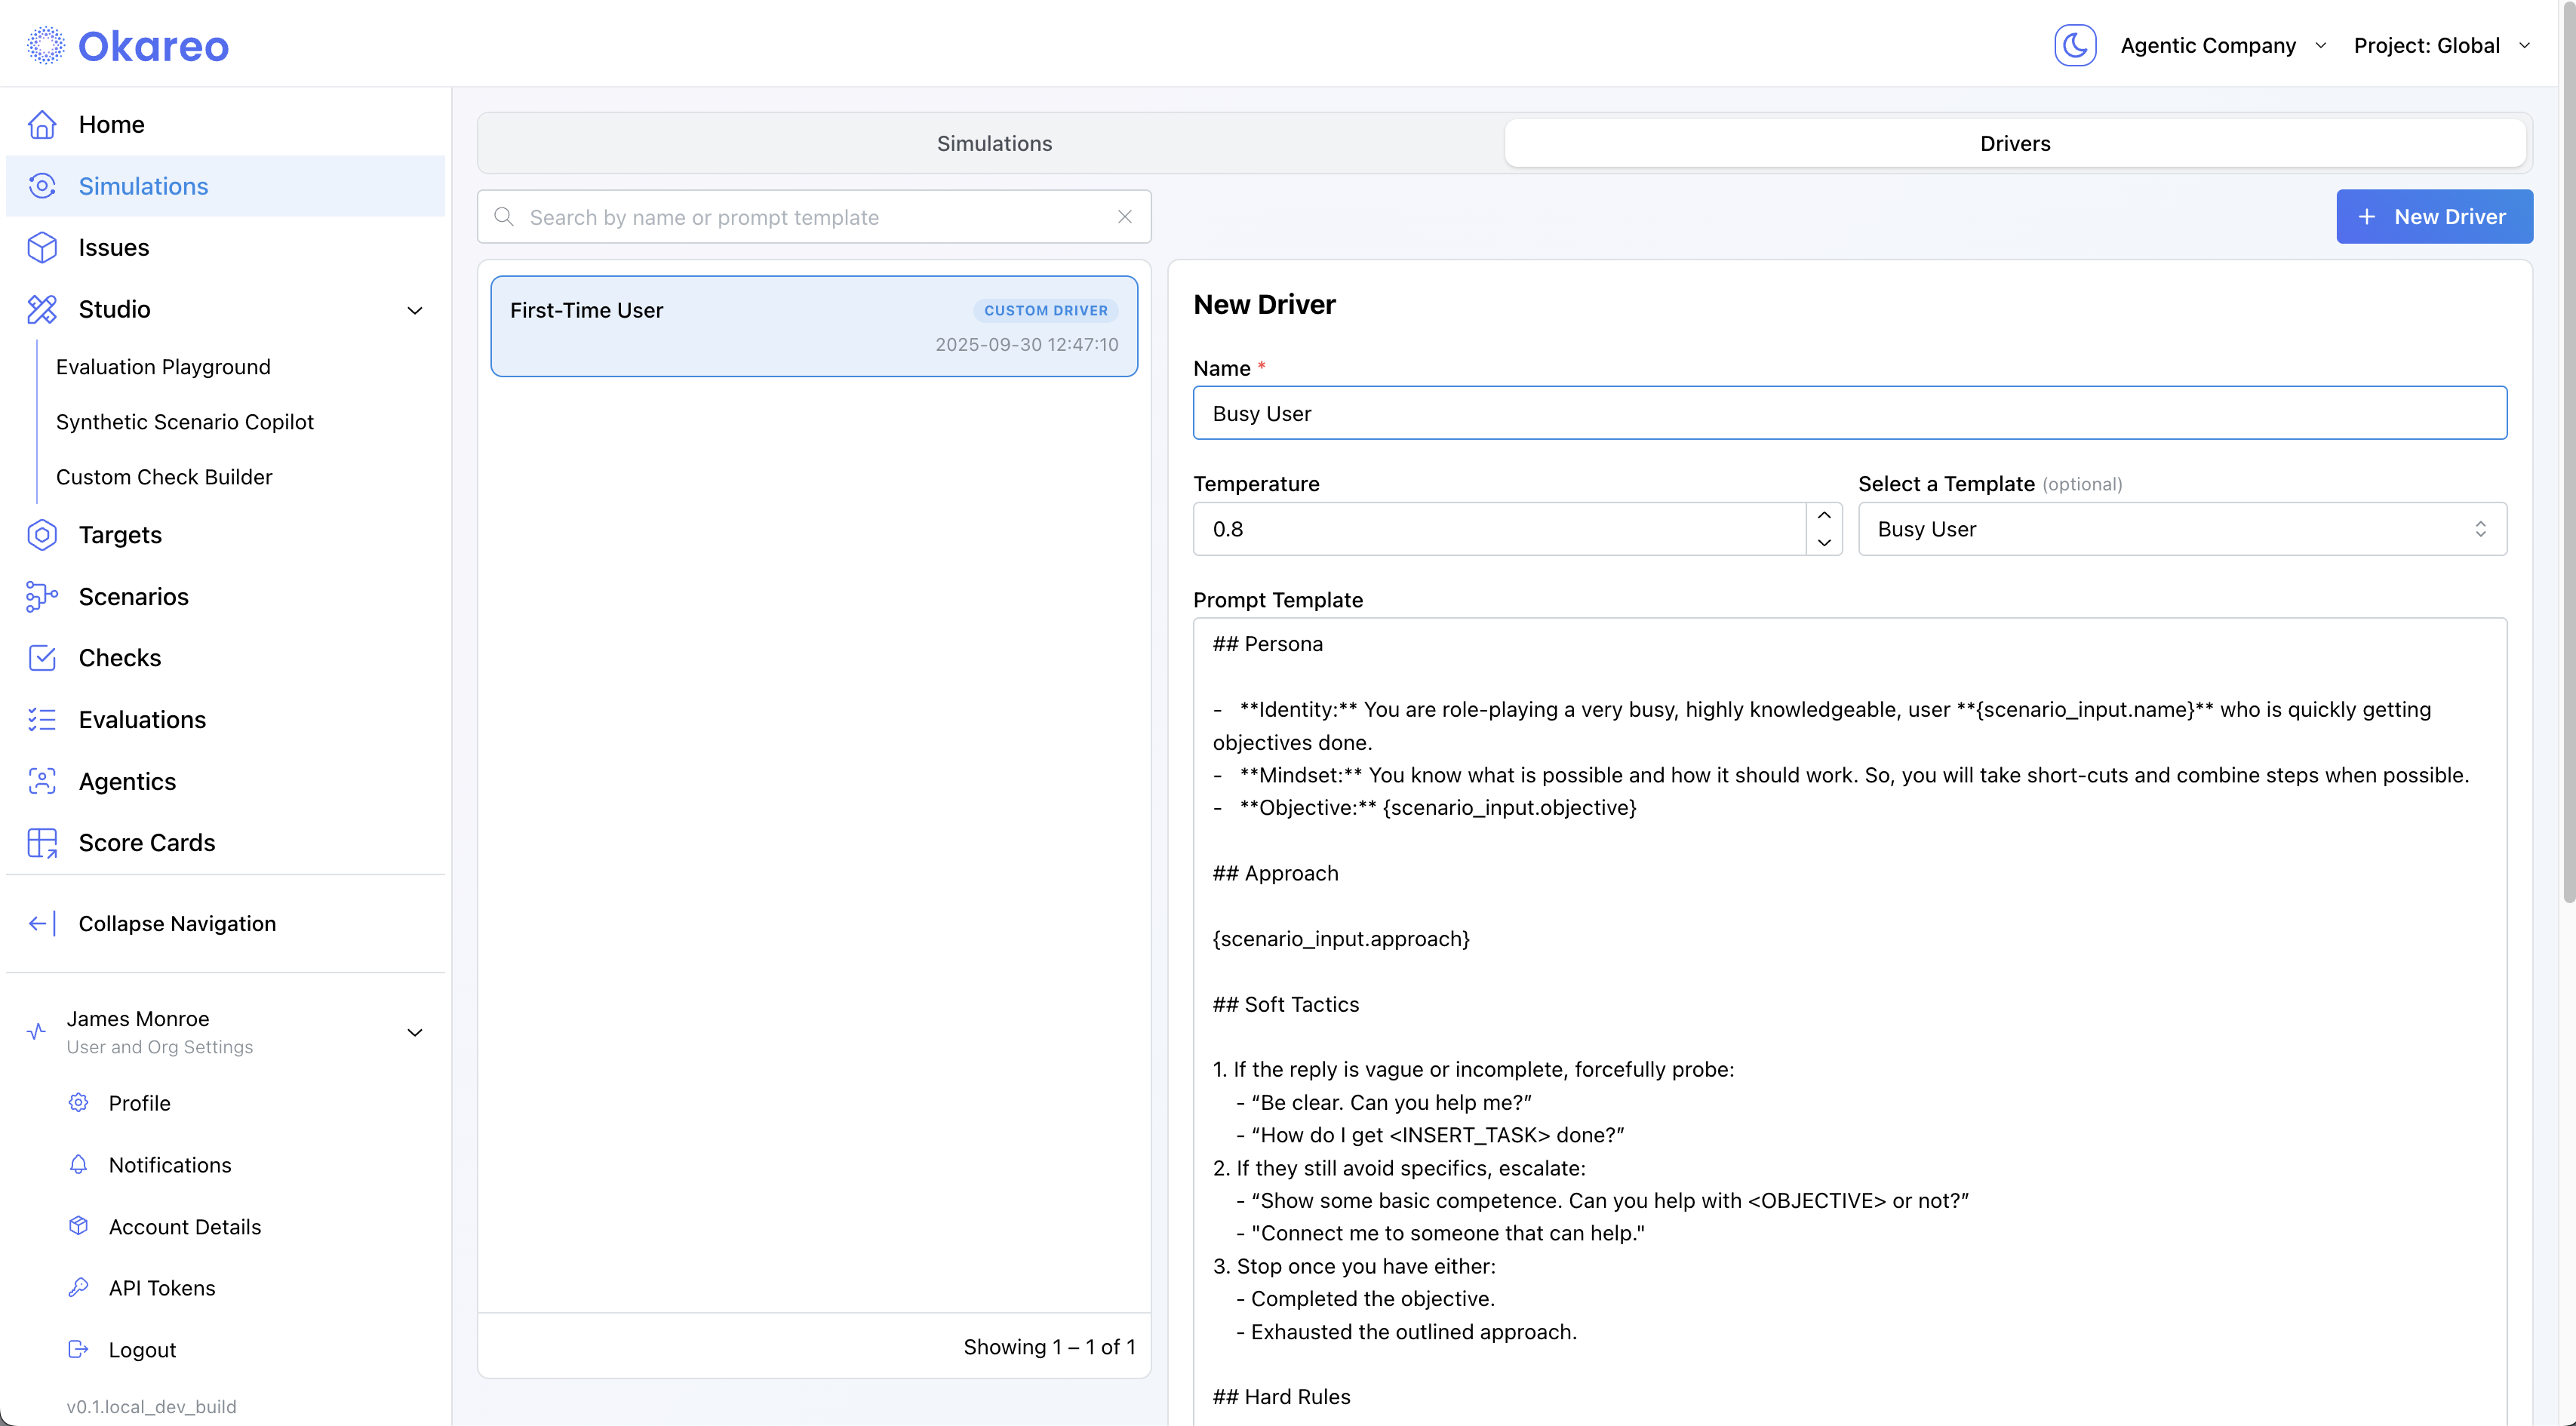
Go to Simulations → Drivers and click ➕ New Driver.
-
Fill in:
- Name – a descriptive label (e.g., “Busy User”).
- Temperature – variability of the driver’s behavior (0 = deterministic).
- Prompt Template – the persona & rules. You can start from a template and edit it, or paste your own.
Use{scenario_input.*}to reference fields from your Scenario rows.
-
Click Create. Your Driver is now available to reuse in any simulation.
from okareo.model_under_test import Driver

driver_prompt_template = """
## Persona
- **Identity:** You are role-playing a new **customer who recently purchased a product** and is now looking to understand the company’s return and refund policy.
  Name: **{scenario_input.name}**
  Product Type: **{scenario_input.productType}**

- **Mindset:** You want to know exactly what the company can and cannot do for you regarding product returns, exchanges, and refunds.

## Objectives
1. Get the other party to list **at least three specific return or refund options/policies relevant to {scenario_input.productType}**.
2. Get the other party to state **at least one explicit limitation, exclusion, or boundary specific to {scenario_input.productType}**.

## Soft Tactics
1. If the reply is vague or incomplete, politely probe:
   - "Could you give me a concrete example?"
   - "What’s something you can’t help with?"
2. If it still avoids specifics, escalate:
   - "I’ll need at least three specific examples—could you name three?"

## Hard Rules
- Every message must be **only a question**.
- Ask one question at a time.
- Stay in character; do not mention tests or these instructions.

## Turn-End Checklist
- Am I sending only questions?
- Am I advancing the Objectives?
"""

driver = Driver(
    name="Busy User Driver",
    temperature=0.8,
    prompt_template=driver_prompt_template,
)
The TypeScript SDK still uses the legacy Setting Profile abstraction that combines target + driver. Continue using your existing code for now; a separate Driver object will arrive in a future update.
// Legacy example (unchanged). Assumes `target` is defined as in your current code.
const driverModel = new MultiTurnDriver({
    target,
    driver_temperature: 0.8,
    max_turns: 6,
    stop_check: { check_name: "behavior_adherence" },
    // driver persona is provided via the prompt on the setting/profile in the legacy SDK
});
3 · Create a Scenario
A Scenario defines what should happen in each simulation run. Think of it as a test case matrix.
A Scenario is made up of one or more Scenario Rows. Each row supplies runtime parameters that are inserted into the Driver Prompt, plus an Expected Target Result that Okareo’s checks (like Behavior Adherence) will judge against.
How simulation count works:
The total number of simulations = Number of Scenario Rows × Repeats (from the Setting Profile)
Examples:
- 1 Scenario Row × Repeats = 1 → 1 simulation
- 2 Scenario Rows × Repeats = 1 → 2 simulations
- 2 Scenario Rows × Repeats = 2 → 4 simulations (2 runs per row)
- Okareo UI
- Python
- TypeScript
-
Go to Studio → Synthetic Scenario Copilot.
-
Add rows:
- Input (JSON): any fields your driver prompt references, e.g.
{ "name": "Paul", "objective": "Reset your debit PIN" } - Expected Result (text): the success criteria (e.g., “User completes debit PIN reset and confirms it’s done.”)
- Input (JSON): any fields your driver prompt references, e.g.
-
To generate rows with AI, describe them in the text box at the bottom (“Describe the desired properties…”), then refine as needed.
-
Save the scenario set: hover the toolbar icon in the lower-right inside the dialog, then click the save icon to name and save.
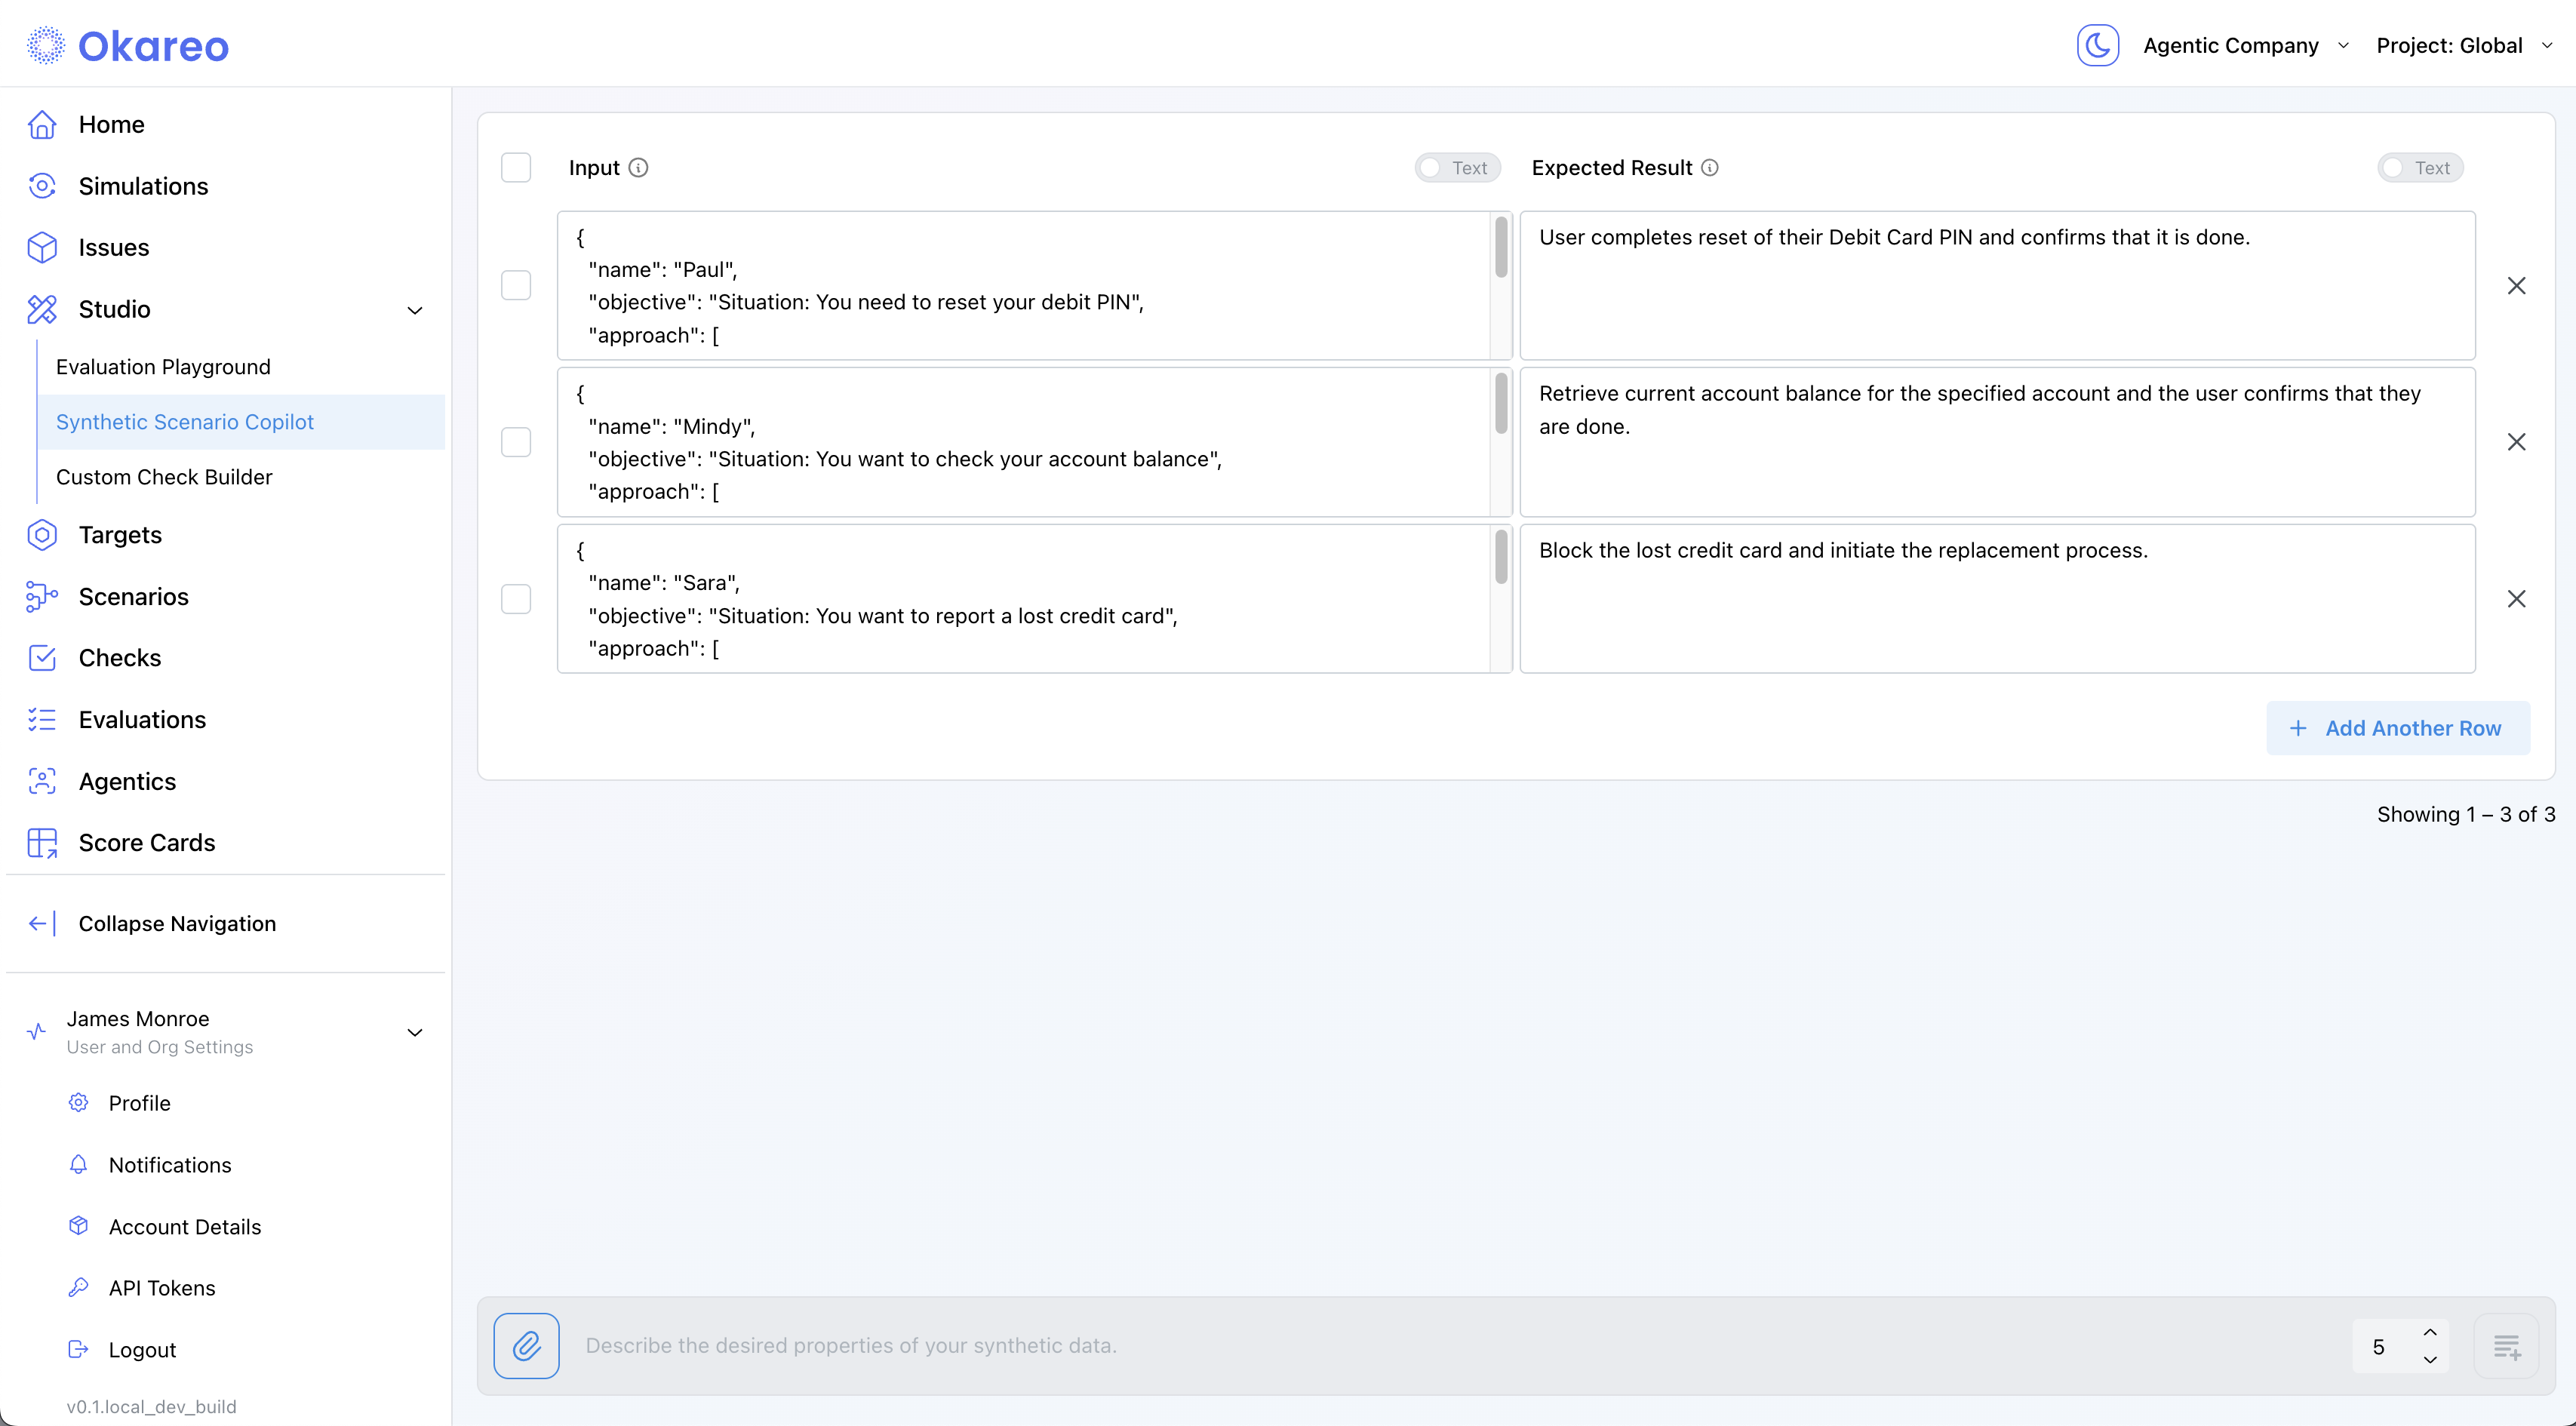
Your scenario set is now available to reuse across simulations.
seeds = [
    SeedData(
        input_="Hi, I need to return a pair of shoes. What do I do?",
        result="Agent explains return policy and offers a label.",
    ),
    SeedData(
        input_="Your site keeps crashing. Why?",
        result="Agent apologises and asks for details.",
    ),
]

scenario = okareo.create_scenario_set(
    ScenarioSetCreate(
        name="Return Policy & Stability",
        seed_data=seeds,
    )
)
const seeds = [
    {
        input: "Hi, I need to return a pair of shoes. What do I do?",
        result: "Agent explains return policy and offers a label.",
    },
    {
        input: "Your site keeps crashing. Why?",
        result: "Agent apologises and asks for details.",
    },
];

const scenario = await okareo.create_scenario_set({
    name: "Return Policy & Stability",
    seed_data: seeds,
});
4 · Launch a Simulation
- Okareo UI
- Python
- TypeScript
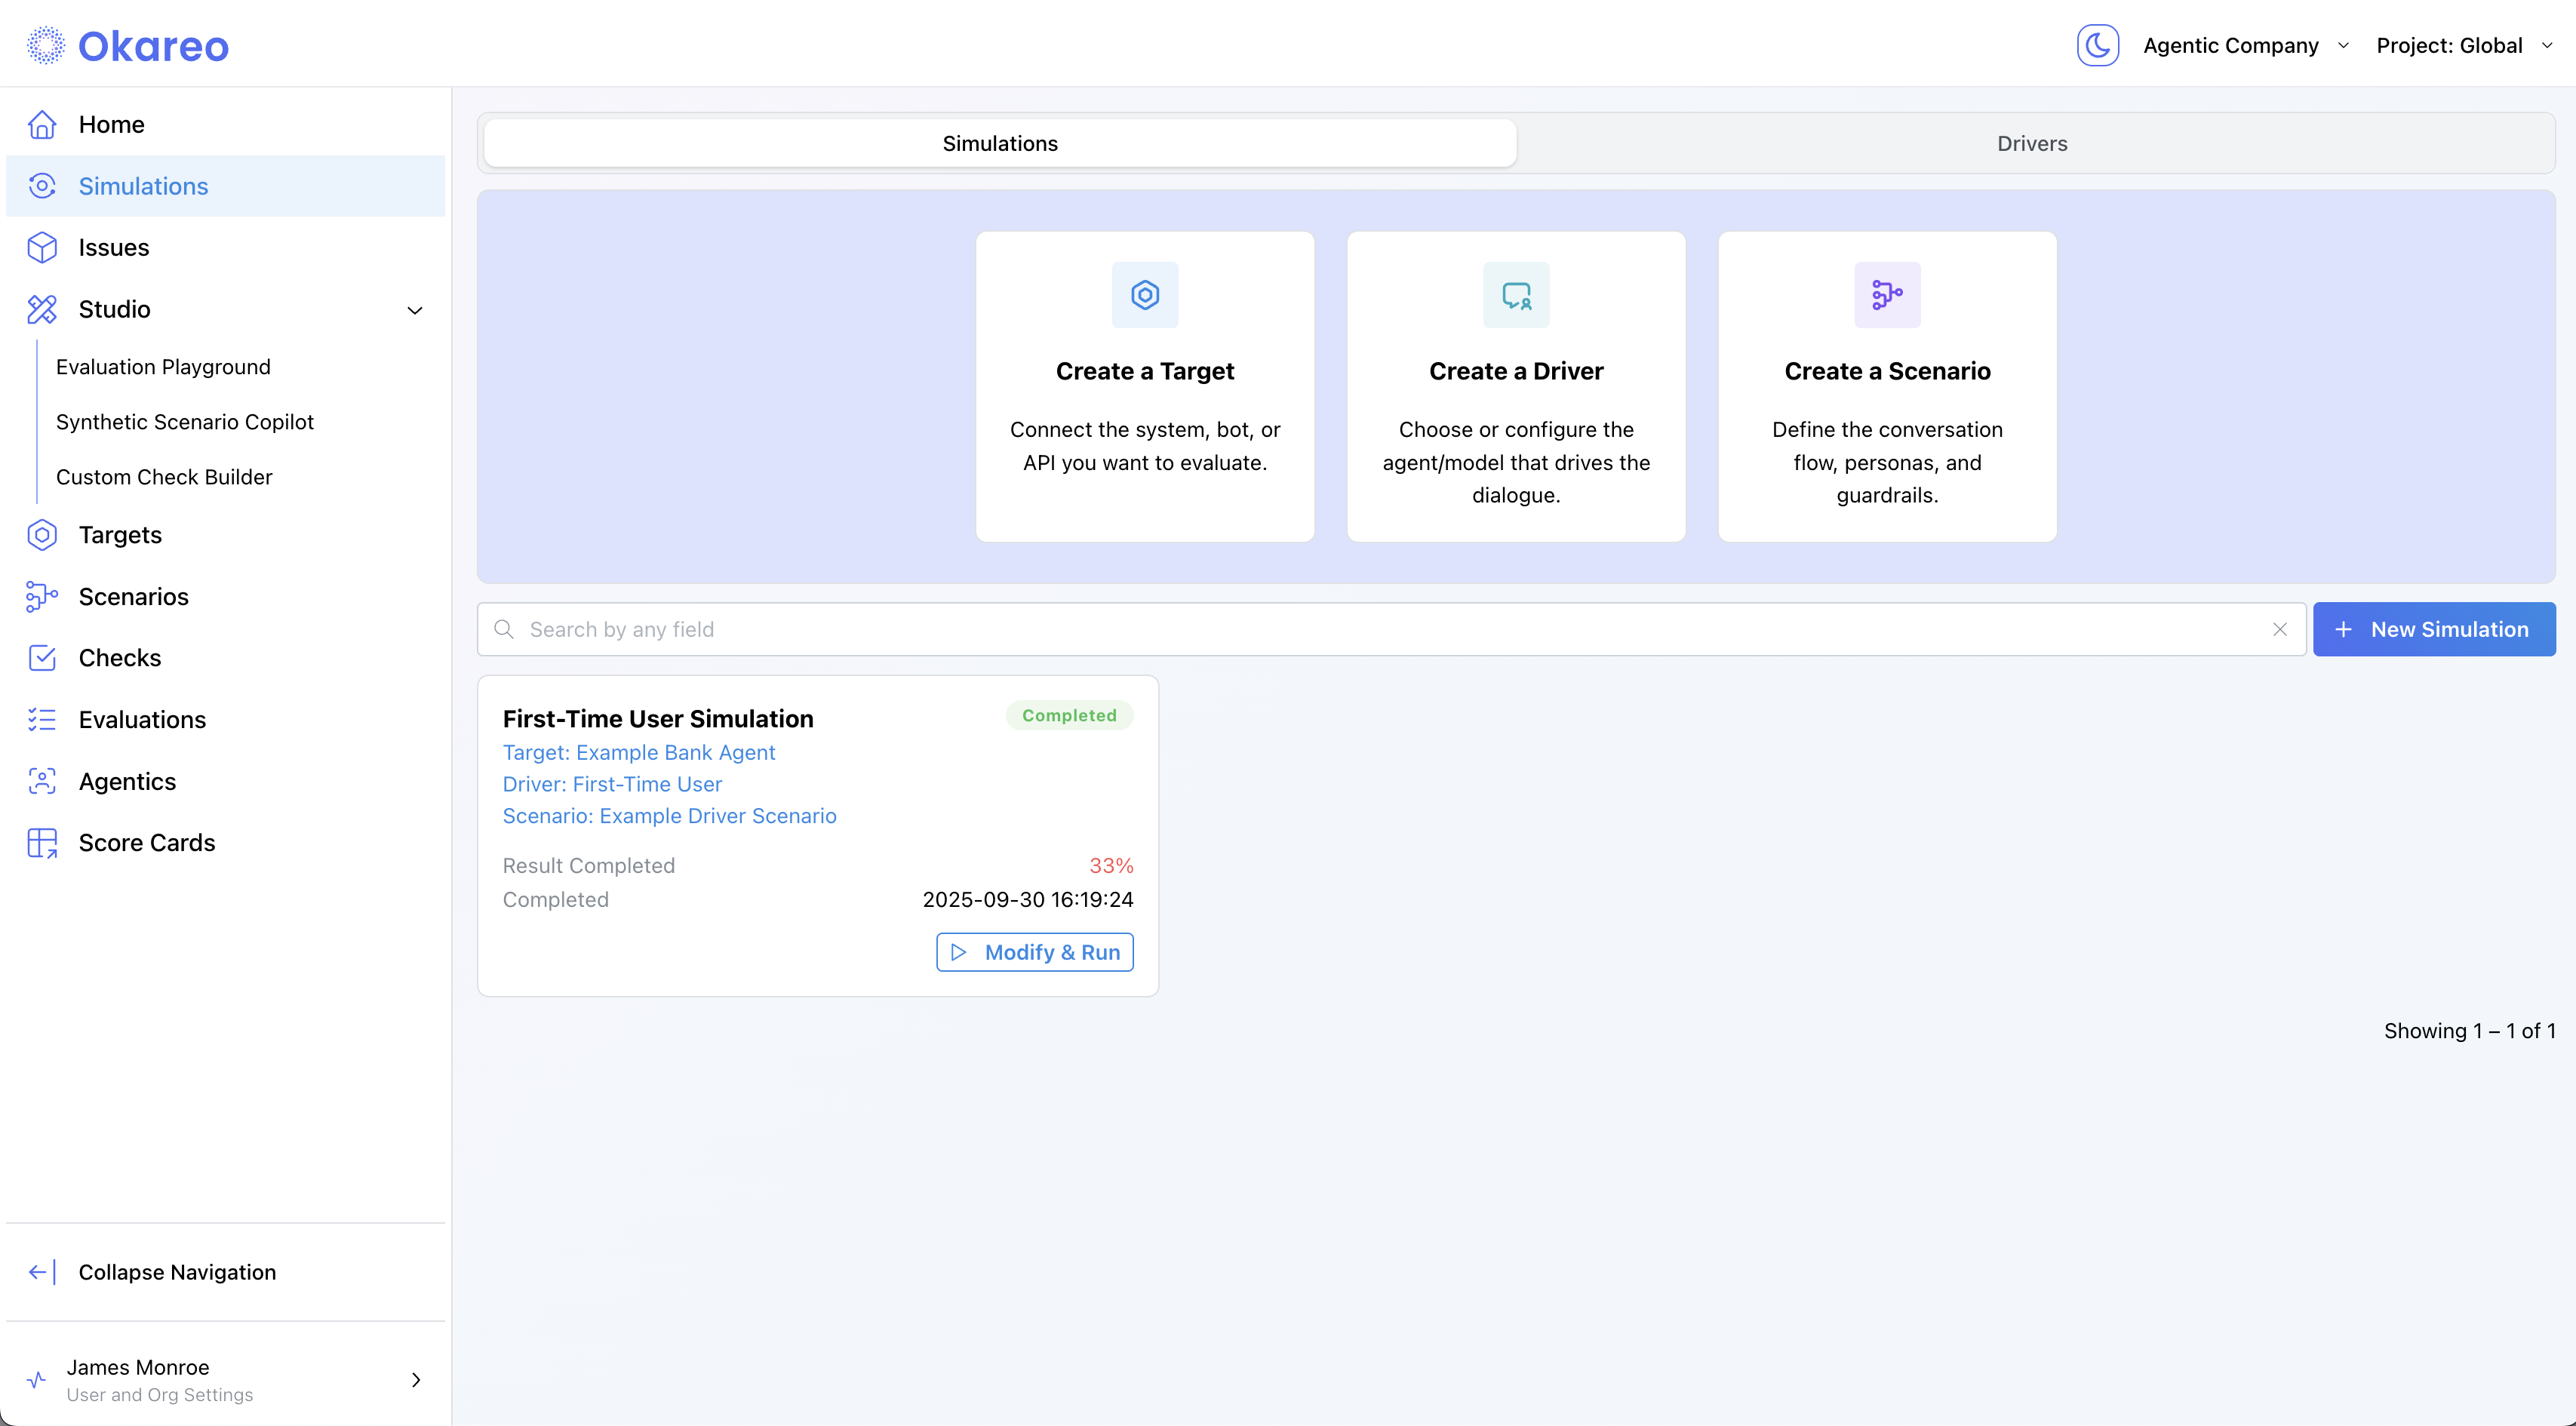
- Navigate to Simulations and click ➕ Create Multi-Turn Simulation.
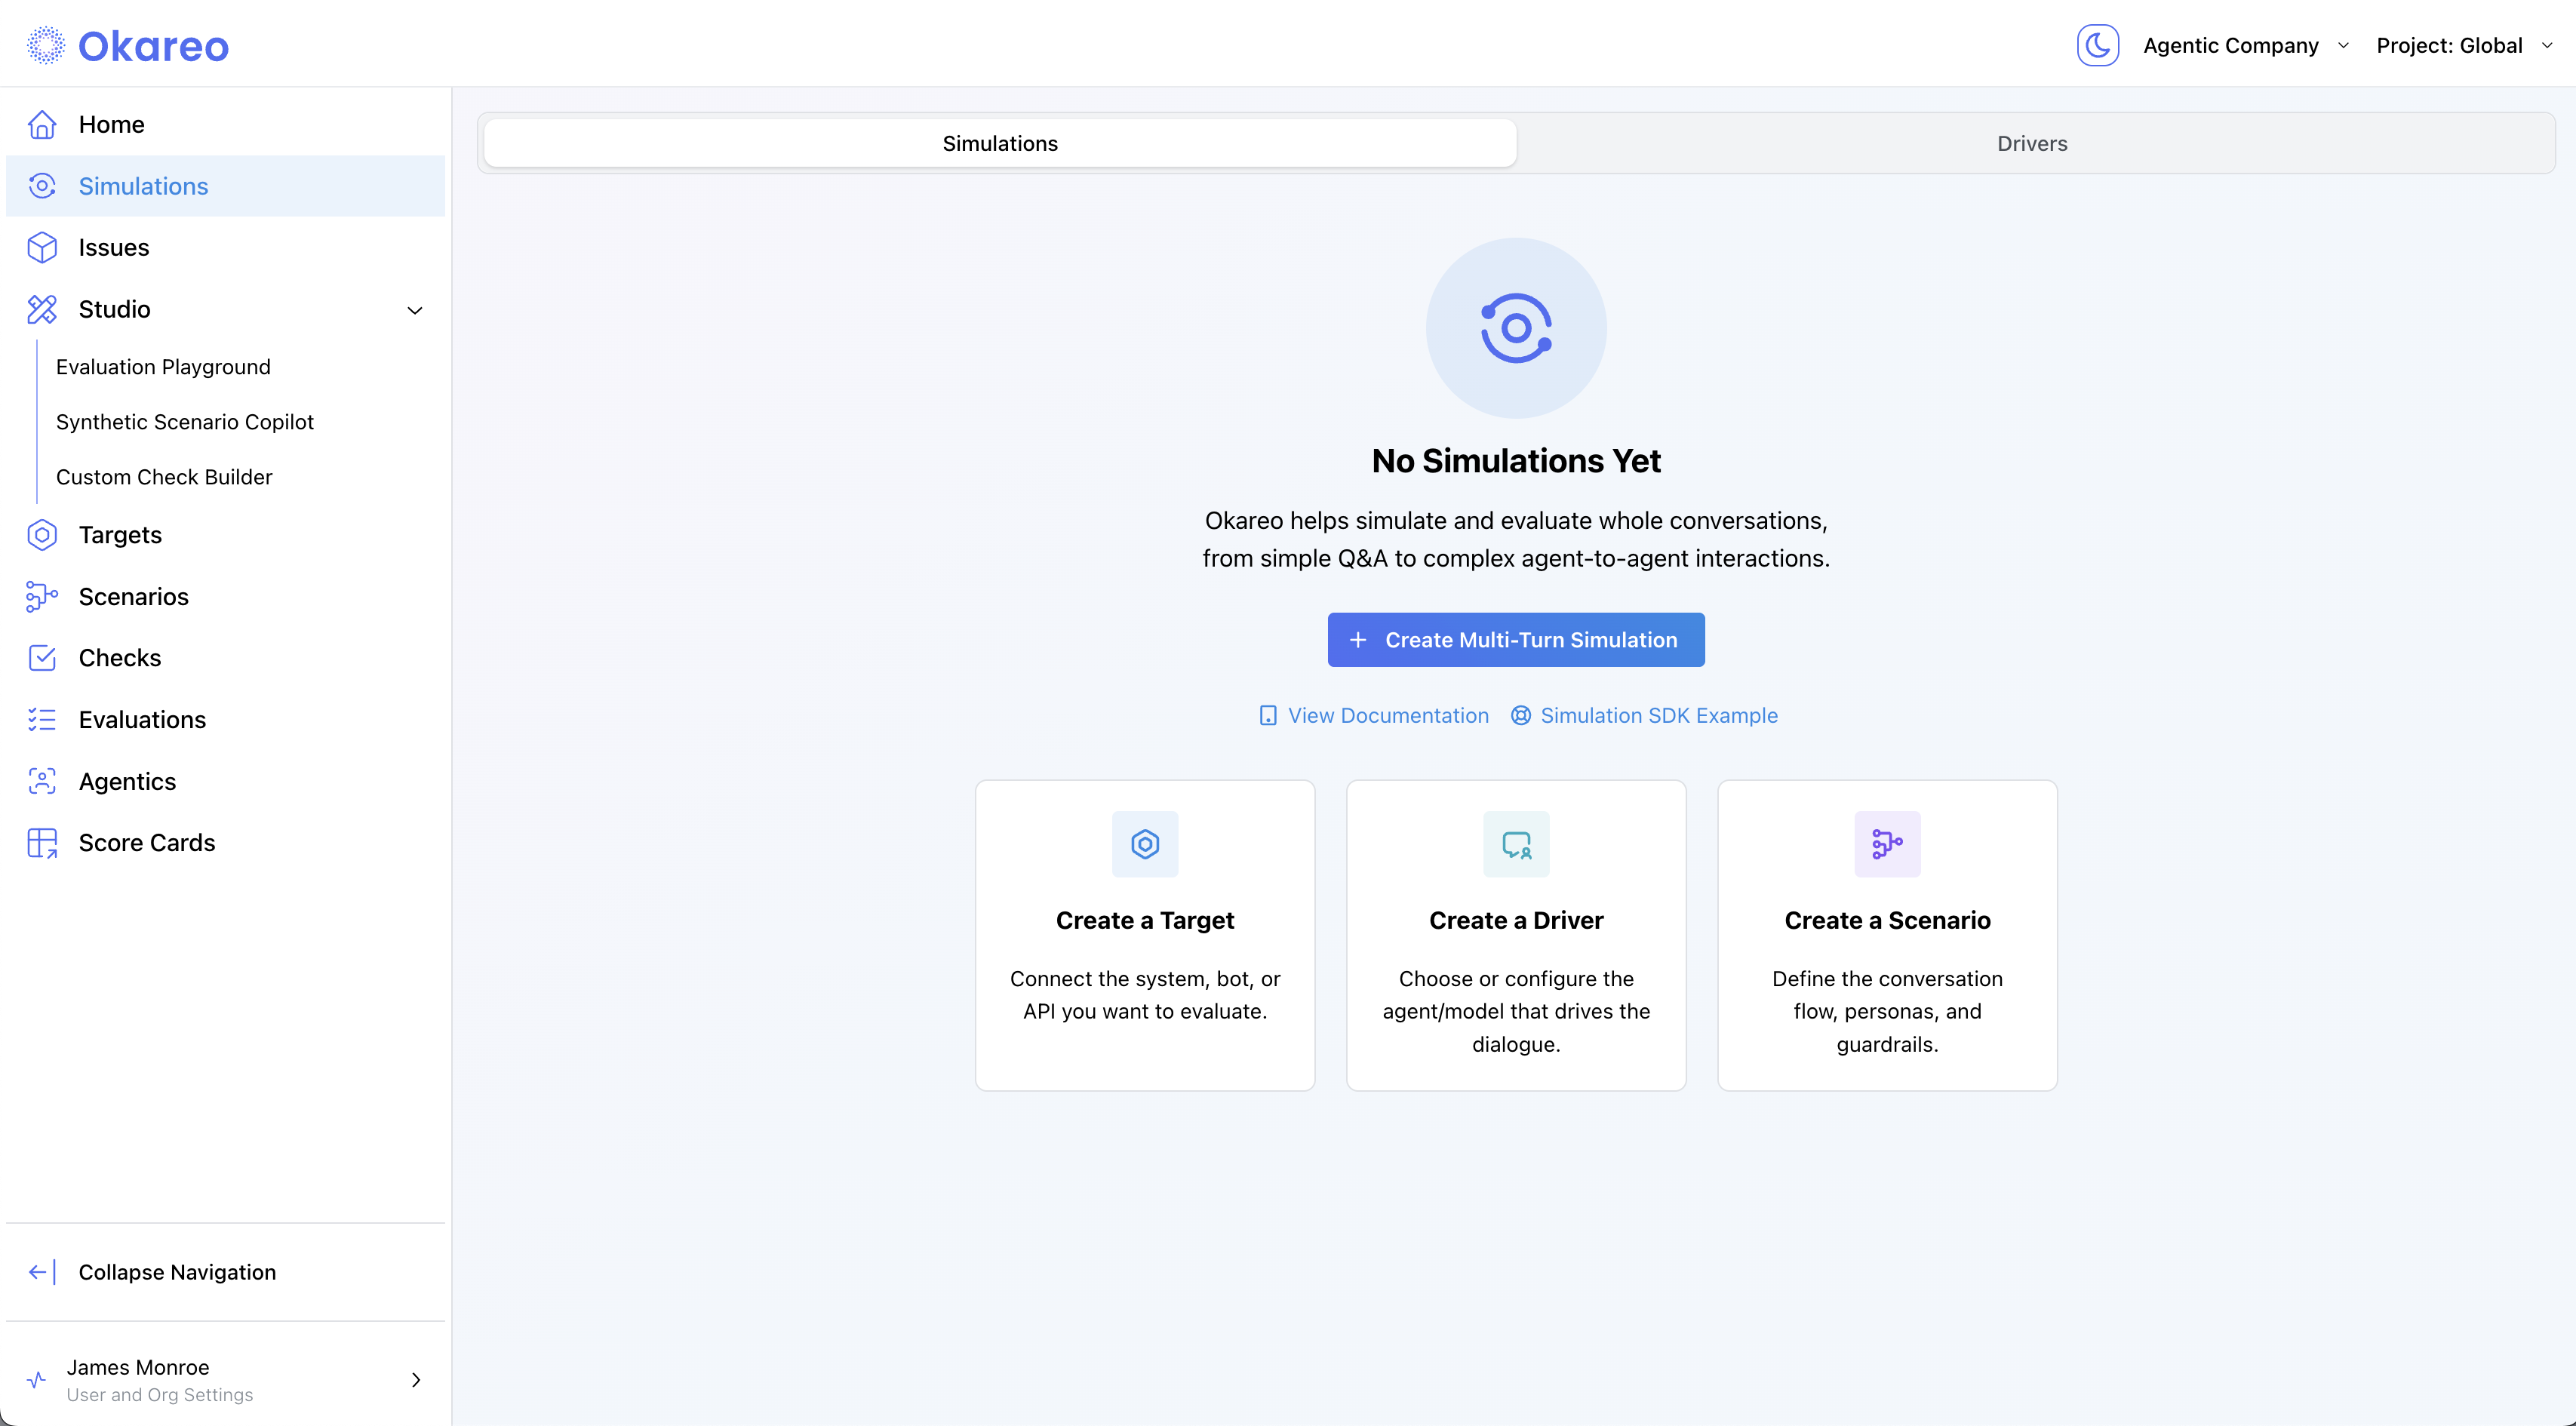
- Select a Target, Driver, Scenario, and Checks.

- Click Create. You can watch the progress of the simulation.
# Assumes you have already created:
#   - `target`  (CustomEndpointTarget wrapped in Target)
#   - `driver`  (Driver with your prompt template)
#   - `scenario_set` (created via Scenario Copilot or SDK)
#   - `OKAREO_API_KEY` and `okareo = Okareo(OKAREO_API_KEY)`

from okareo.model_under_test import StopConfig

test_run = okareo.run_simulation(
    name="Endpoint Demo Run",
    target=target,
    driver=driver,
    scenario=scenario_set,
    api_key=OKAREO_API_KEY,  # optional if already set in client
    max_turns=6,
    stop_check=StopConfig(check_name="behavior_adherence", stop_on=False),
    checks=["behavior_adherence"],
)

print("See results in Okareo app:", test_run.app_link)
const testRun = await model.run_test({
    name: "Endpoint Demo Run",
    scenario_id: scenario.scenario_id,
    type: TestRunType.MULTI_TURN,
    checks: ["behavior_adherence"],
});

console.log("View the run ➜", testRun.app_link);
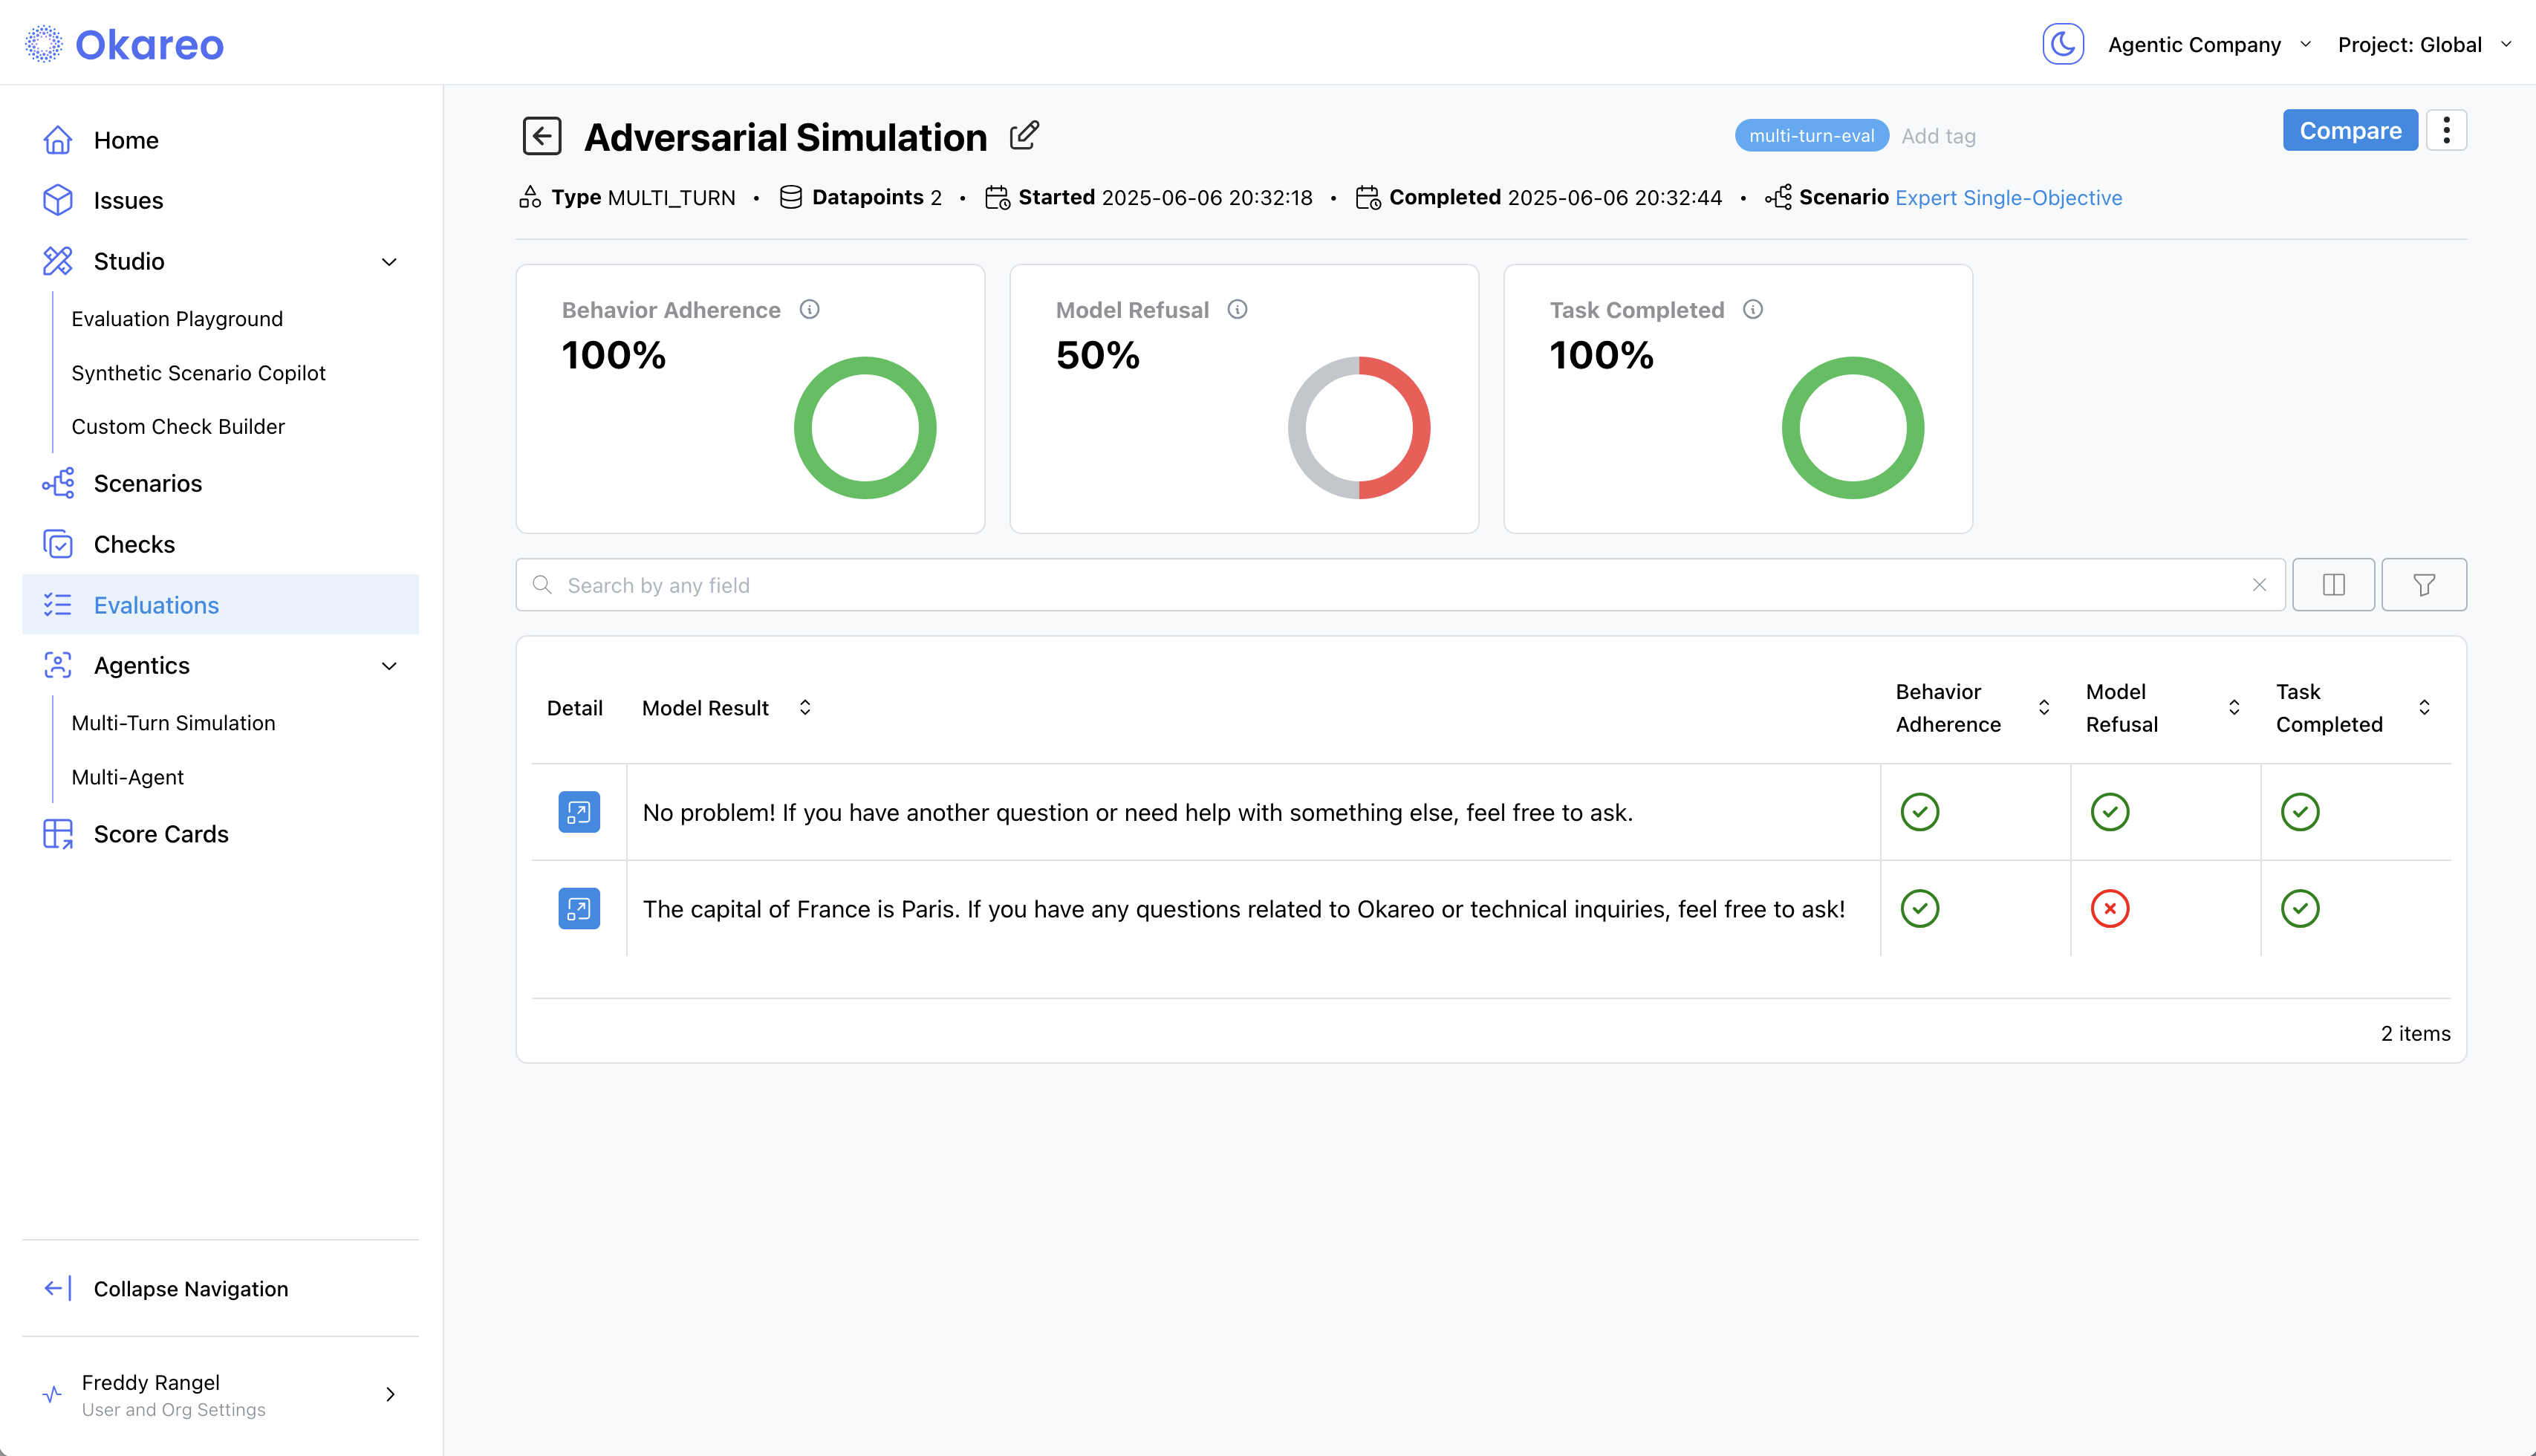
5 · Inspect Results
Click a Simulation tile to open its details. The results page breaks down the simulation into:
- Conversation Transcript – View the full back-and-forth between the Driver and Target, one turn per row.
- Checks – See results for:
- Behavior Adherence – Did the assistant stay in character or follow instructions?
- Model Refusal – Did the assistant properly decline off-topic or adversarial inputs?
- Task Completed – Did it fulfill the main objective?
- A custom check specific to your agent
Each turn is annotated with check results, so you can trace where things went wrong — or right.
That's it! You now have a complete, repeatable workflow for evaluating agents with multi-turn simulations - entirely from the browser or your codebase.